Information and examples shown on this portfolio is for demonstration purposes only and does not contain any harmful or sensitive information. Projects displayed are with the expressed permission of the company under which they were created.
Click on the title of each project to expand or collapse it.
WinForms
-
Build Sheet Tool (Version 1)
C# - Solo Development
This is the first large project I had ever done with WinForms and Microsoft Access. This application allows a user to create customizable products based on a configurable list of items and options. It was created to be used as a frontend order intake tool for salesmen where they could generate organized, quality Estimates for customers and accurate, formatted Build Sheets for the whole company to use.
Feature List
- Configurable Items
- Items and options (and rules) are configured via a separate application for quality control (Product Configurator)
- Revision Control
- Users are able to view previous versions of the customized product in the application itself
- Reference Pictures
- Each picture appears on the build sheet with its own editable description and can be in reference to multiple items
- Generate High Quality Documents
- These documents also show when an item is custom, has an additional description, has a reference picture, or was previously a different value (revision control)
See an example estimate here: Estimate
See an example build sheet here: Build Sheet
- Rule Based Configurator (NOT IMPLEMENTED)
- This is currently reading from a source that has configurable rules. Unfortunately, I was pulled away from this project before I could fully implement the rules into the application
0Main Screen/pic1.png) There are three main tabs: Pending Orders, Orders In Progress, and Archive. Archive is currently selected. If there are any orders open, there will be an 'Open Orders' tab to the right of the 'Archive' tab.Order Editor (1 of 2)
There are three main tabs: Pending Orders, Orders In Progress, and Archive. Archive is currently selected. If there are any orders open, there will be an 'Open Orders' tab to the right of the 'Archive' tab.Order Editor (1 of 2)/pic2.png) This is the opening view of an order. At the bottom, there are varying controls based on the order's status. Since this is a completed and archived order, there are no buttons.
This is the opening view of an order. At the bottom, there are varying controls based on the order's status. Since this is a completed and archived order, there are no buttons.
There are two main sections: Sales Information and Box Builder (data shown is for example use only). From this screen, you can open up the generated Estimate or Build Sheet, edit data, add pictures, view previous revisions, and pop the order in and out of the main application for side-by-side order viewing / editing. The 'Sales Information' section is collapsible since most of the viewing / editing is done in the 'Box Builder' section.Order Editor (2 of 2)/pic3.png) Each item has a list of values that it can be set to and each value has its own price. If an item can be custom, it will have a 'Custom' option in its list of values. If 'Custom' is selected, the user is able to change the price of the item and must enter the new custom value in the 'Description' field.
Each item has a list of values that it can be set to and each value has its own price. If an item can be custom, it will have a 'Custom' option in its list of values. If 'Custom' is selected, the user is able to change the price of the item and must enter the new custom value in the 'Description' field.
When an item has a description set, it will be given a comment image on the Estimate and Build Sheet and have its description written out below the item and its value. However, if the item value is set to 'Custom', the comment image will be replaced by a wrench and the value of the item will be replaced by the description on the Estimate and Build Sheet.
This image also displays the collapsed 'Sales Information' section and an expanded 'Pictures' menu. Each picture can be tied to multiple items (this shows on the Build Sheet) and has its own description. Added pictures will be placed on an appendix section in the Build Sheet. - Configurable Items
-
ECN and ECR Tool
C# - Solo Development
This tool was requested by engineering for tracking "Engineering Change Notices" and recieving and responding to "Engineering Change Requests". Key employees from different departments would be able to sign off or reject ECN's from engineering. In addition, any employee could submit an ECR and recieve optional email updates on its status.
Feature List
- Automatic Email Updates
- Recieve email updates notifying when action is required or on the status of ECN's or ECR's
- In-Depth Logging
- Logs are created for each ECN that shows all the changes and updates relating to the ECN
- Revision Control
- View previous revisions of ECN's
- SolidWorks Importing
- Import BOM's directly from SolidWorks and select parts to add to an ECN
- Excel Exporting
- Export ECN's or ECR's directly to Excel
- Customizable Approval / Reject Process
- Only send the ECN to selected departments to keep other departments from seeing unneeded information
- Link ECR's directly to ECN's
- Creators of ECR's can choose to opt into email updates and ECN's can be created directly from ECR's
- Application Tutorials and Help
- View tutorials directly in the application at any time and contains application help documentation
0Main Screen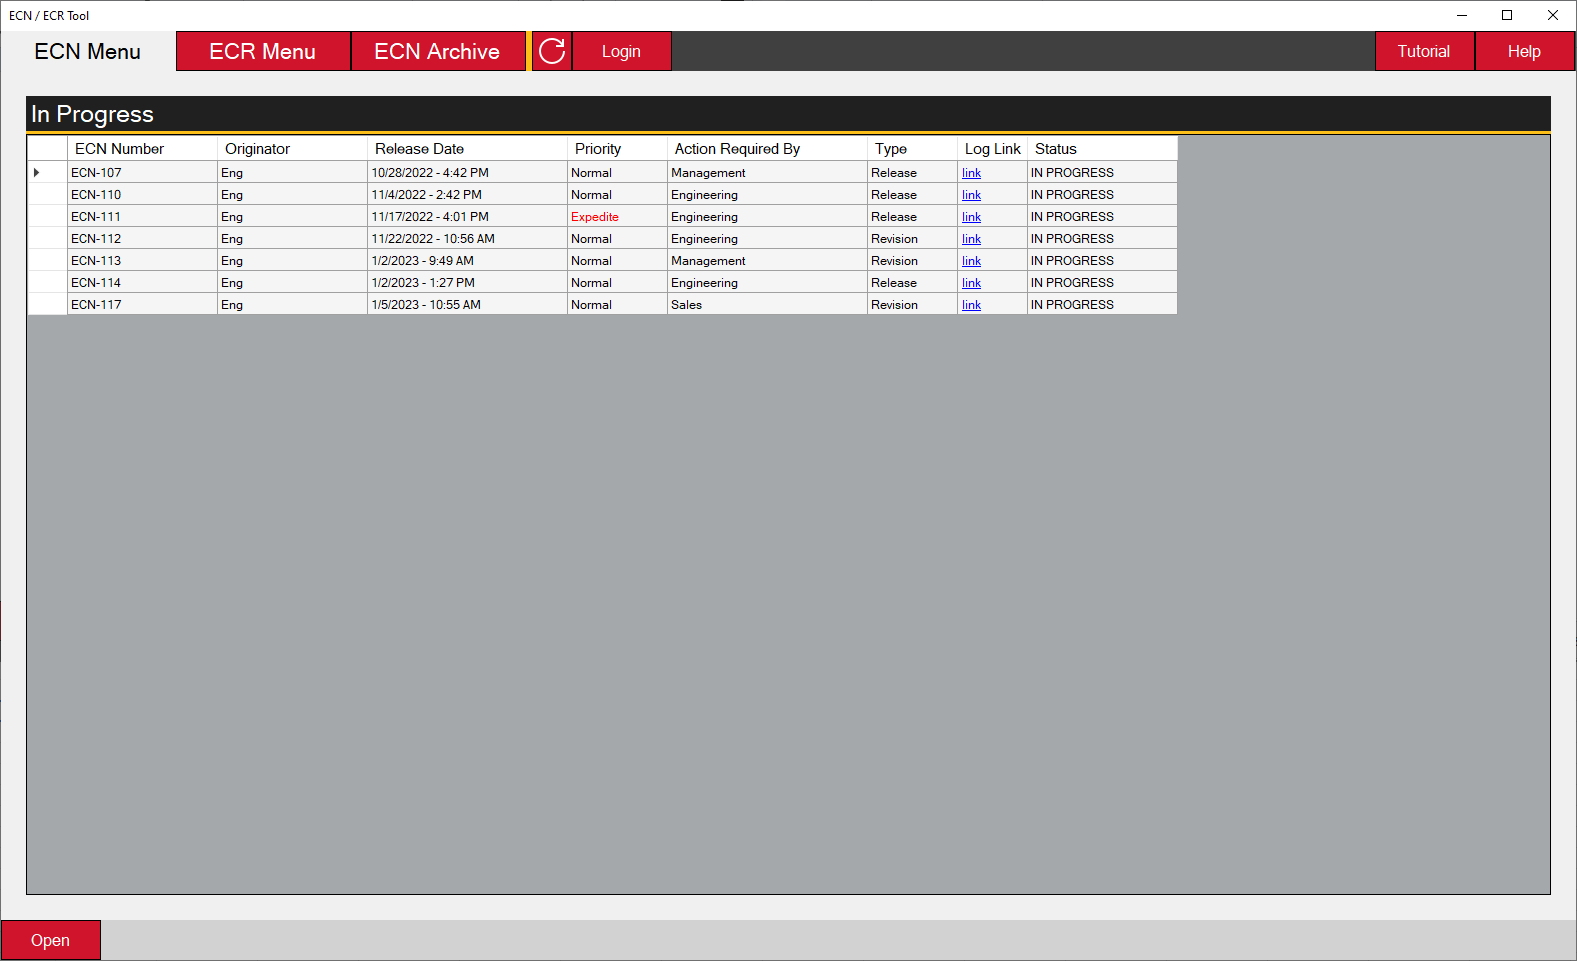 There are three main tabs: ECN Menu, ECR Menu, and ECN Archive. ECN Menu is currently selected.
Depending on the logged in user's department, more information is provided on the ECN Menu and ECR Menu tabs. Since no user is logged in, the only visible information is 'In Progress' ECN's and they will only be able to open them as read only.Main Screen Tutorial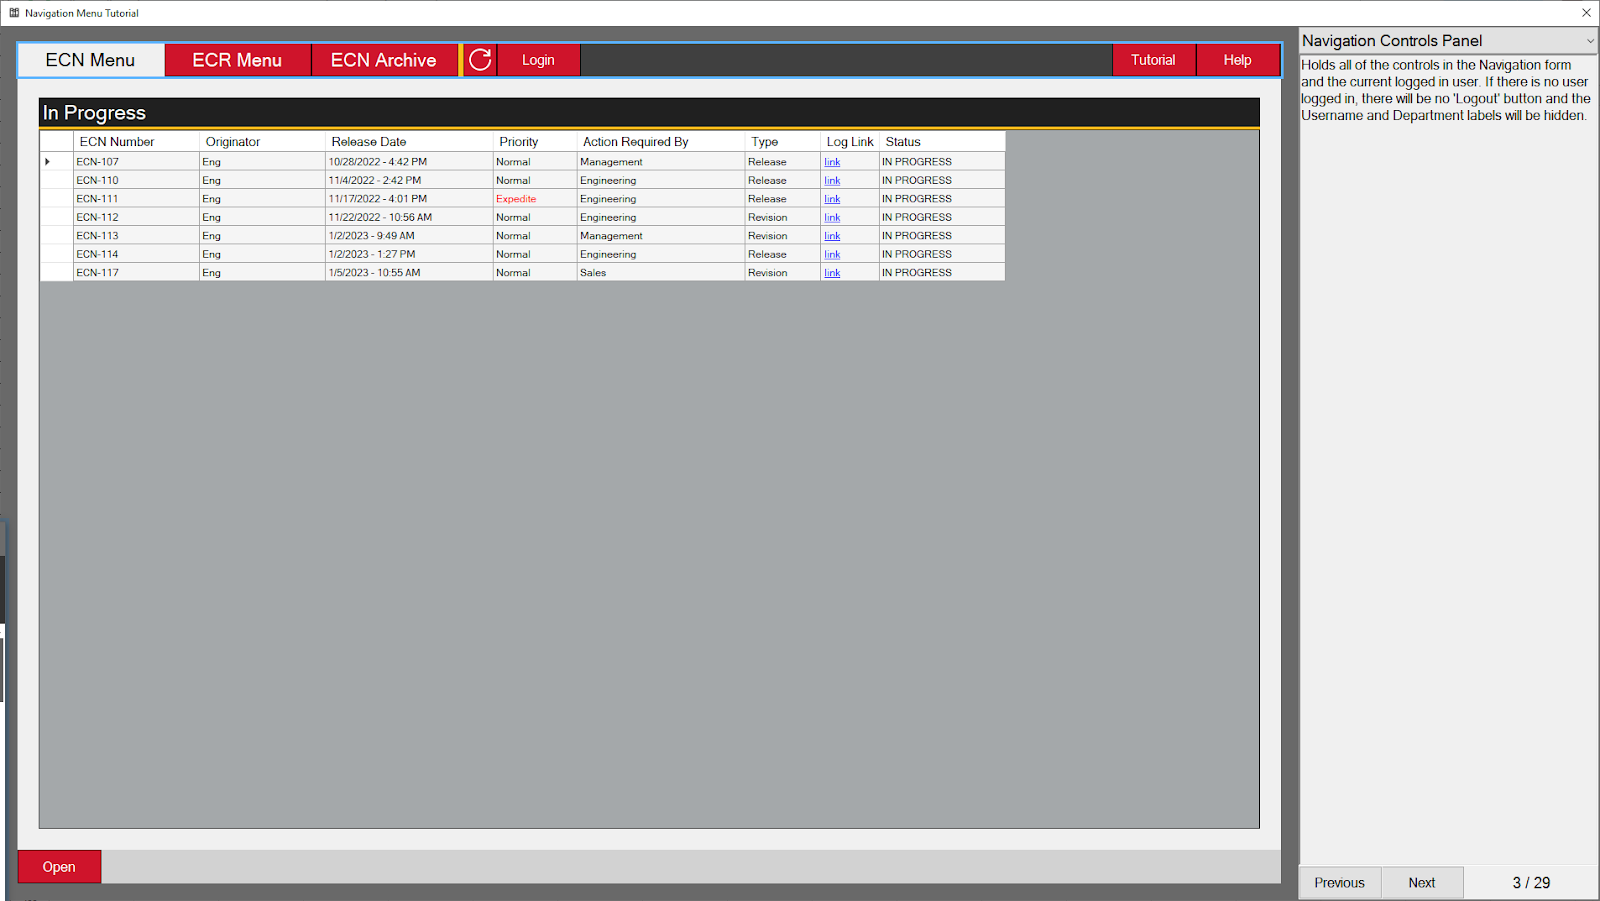 This is an example of the tutorials that are baked into the application.
Each tutorial page highlights specifics to make it easier to follow along. In addition, users can click on elements in the tutorial to go to the page explaining it.ECN (Read Only)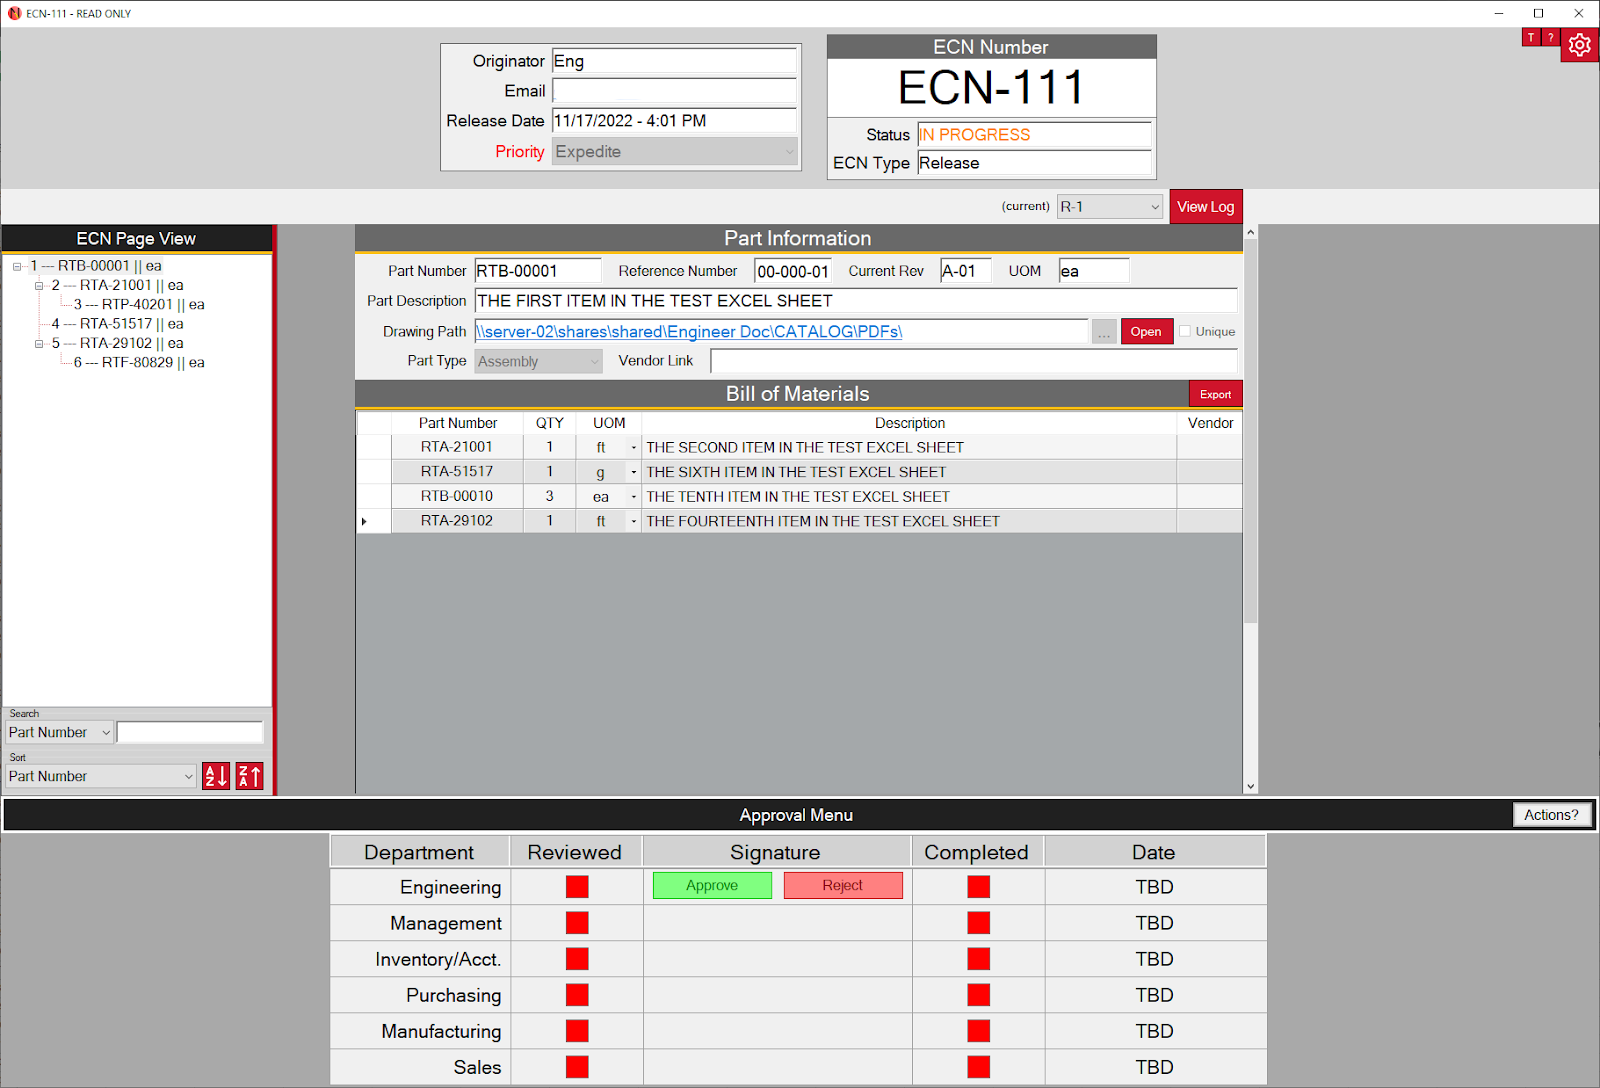 The read only view of an ECN. Each ECN can contain multiple pages which can be nested to represent a part's BOM.
A user can see any information they need about the ECN in read only. They can also view any previous revisions and the current progress of the ECN via the 'Approval Menu' (collapsible) at the bottom.ECN Tree View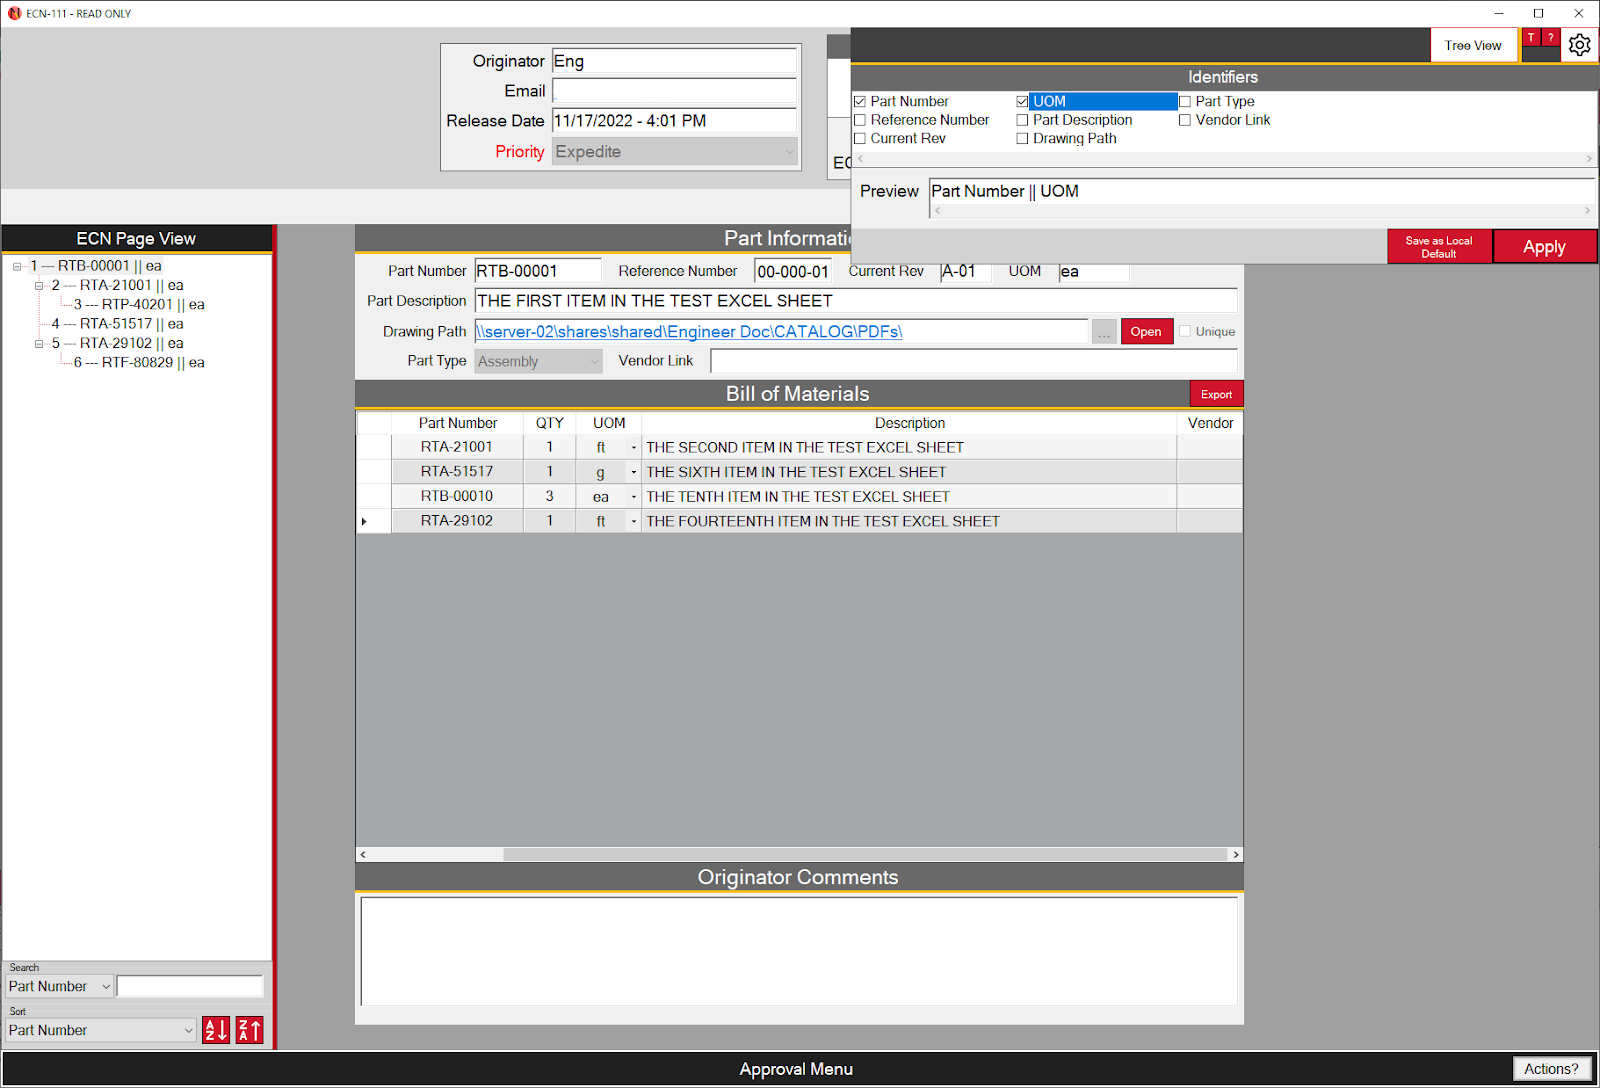 Pages in the ECN can be navigated using the 'ECN Page View' tree view on the left side of the screen. This tree view can be sorted and searched for specific information.
By clicking the gear in the top right corner, the information displayed in the tree view can be edited and saved per user (priority) or per computer if no user is logged in.0ECN Walkthrough (1 of 4) - Menu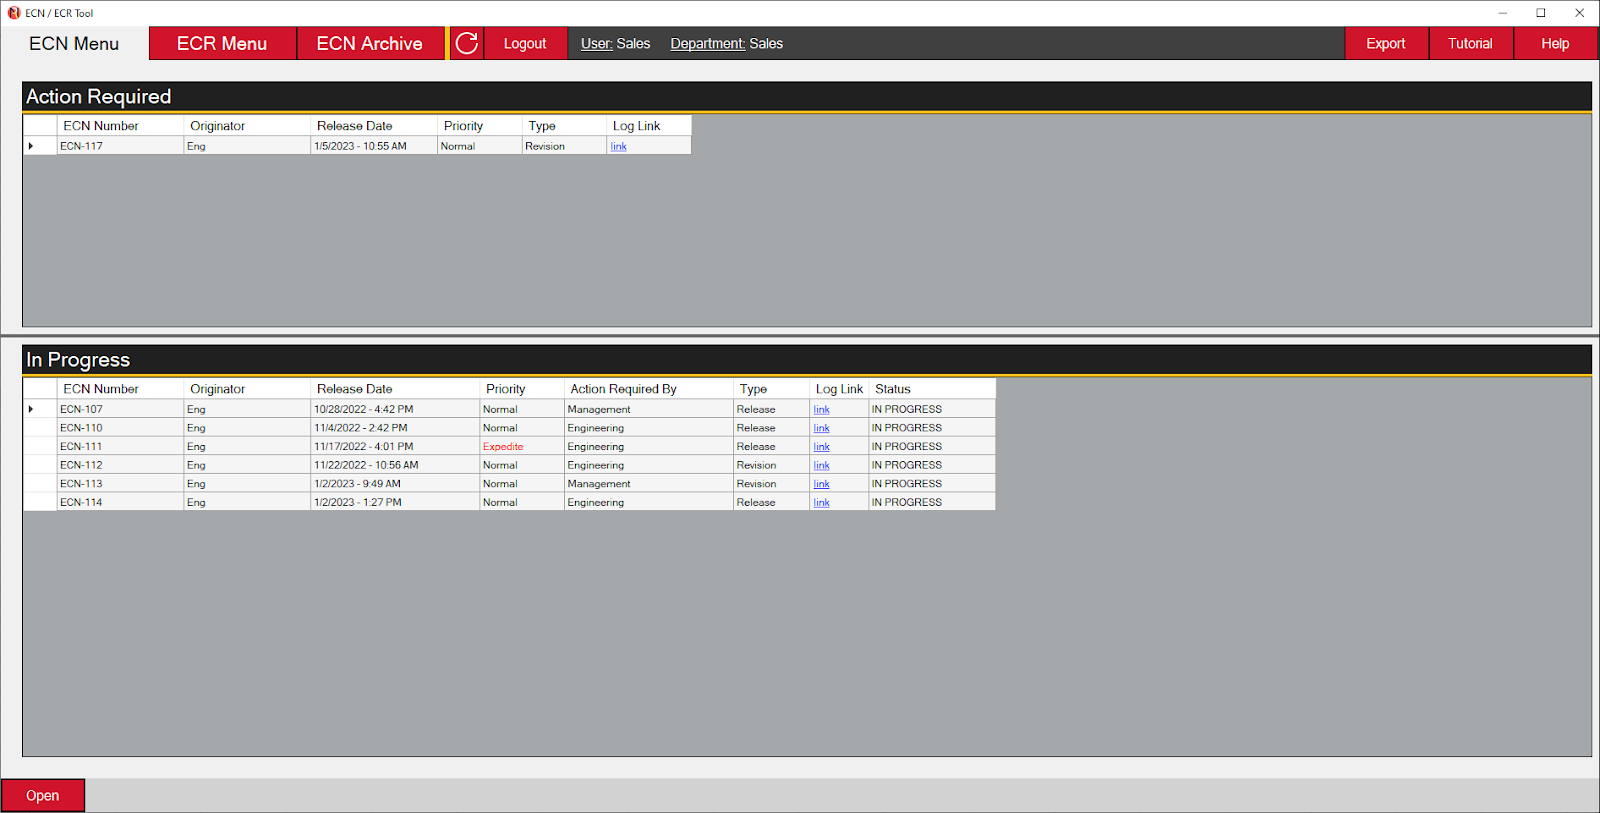 Here's a short walkthrough on general usage / back and forth between users. First, we'll start out at the ECN menu logged in as a user belonging to the department 'Sales'. Now that we are logged in, the ECN menu changes.
Since we do not belong to the 'Engineering' department, we only see the standard and 'Action Required' tables. Any ECN that currently requires action from the department of the logged in user will appear in the 'Action Required' table.ECN Walkthrough (2 of 4) - Reviewer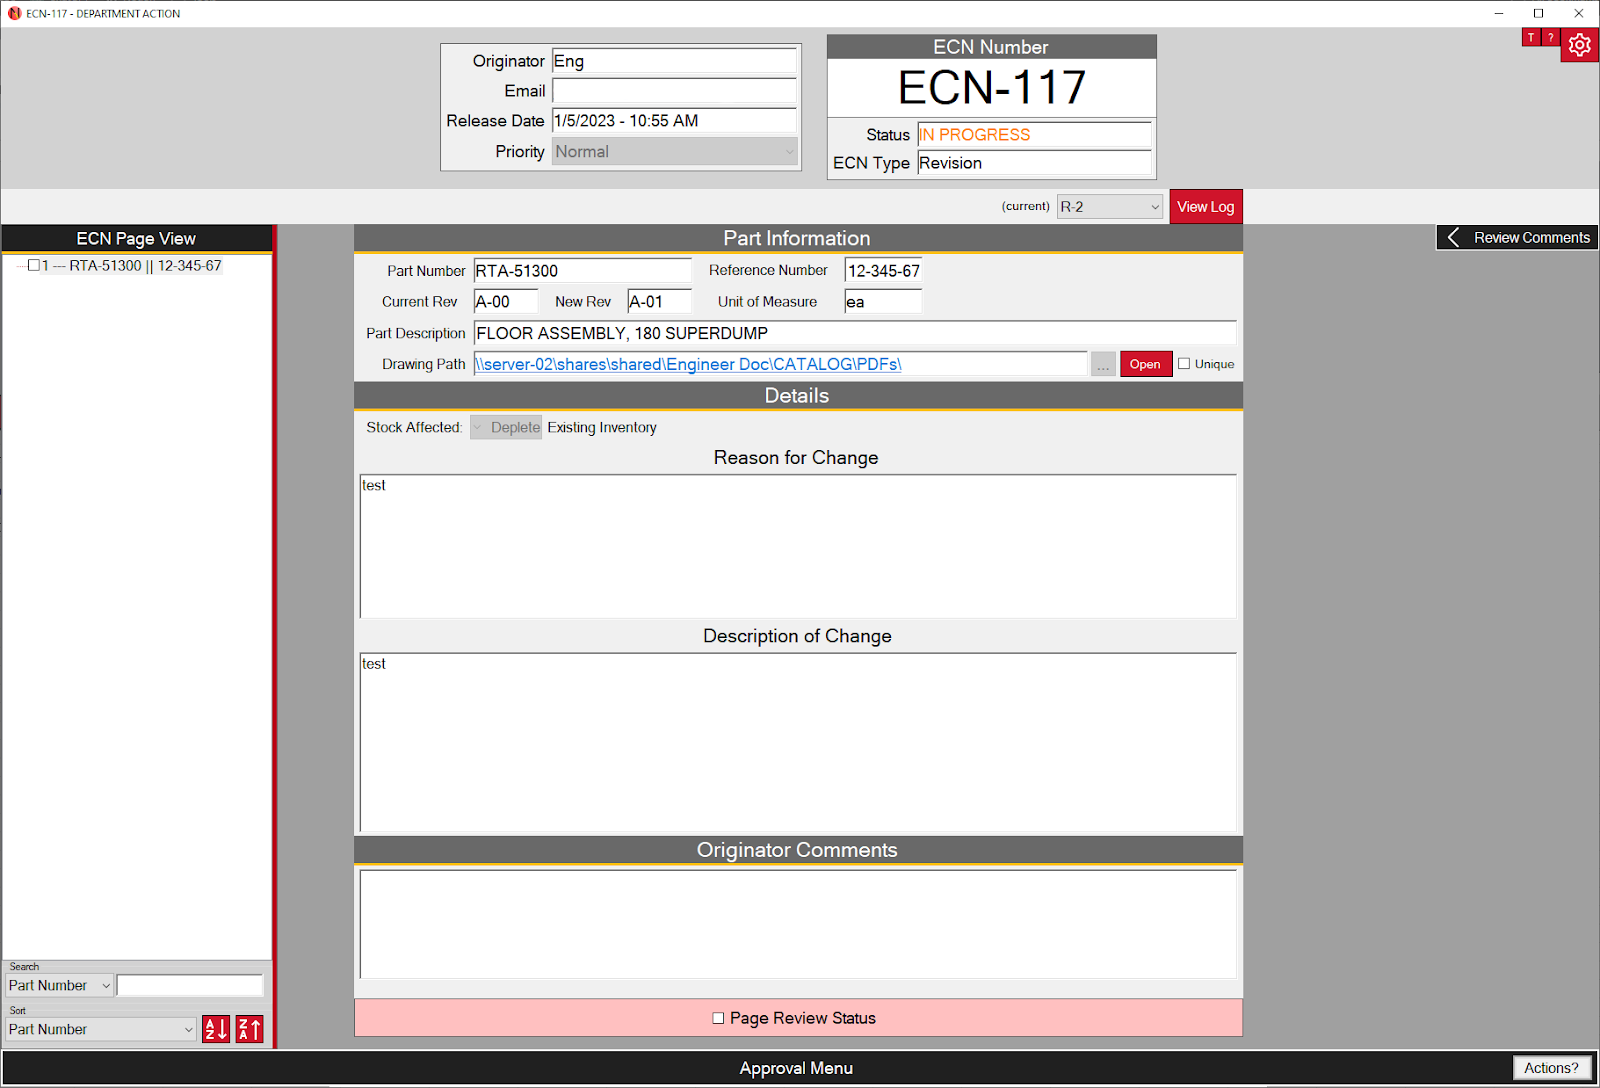 When reviewing an ECN, users need to review each page in the ECN and mark them at the bottom as one of the following:
- Checked (Green): Approved / no errors on the page
- Indeterminate (Yellow): Reviewer has questions or concerns about the page
- Unchecked (Red): Reviewer believes this page may have wrong information or requires an update / change
Based off the reviewer's marks, they may either approve or reject the ECN. If they approve the ECN, the next department will recieve an email notification letting them know that their action is required. If they reject the ECN, it will go back to the originator where they can respond to the rejection. This walkthrough shows the rejection process.ECN Walkthrough (3 of 4) - Originator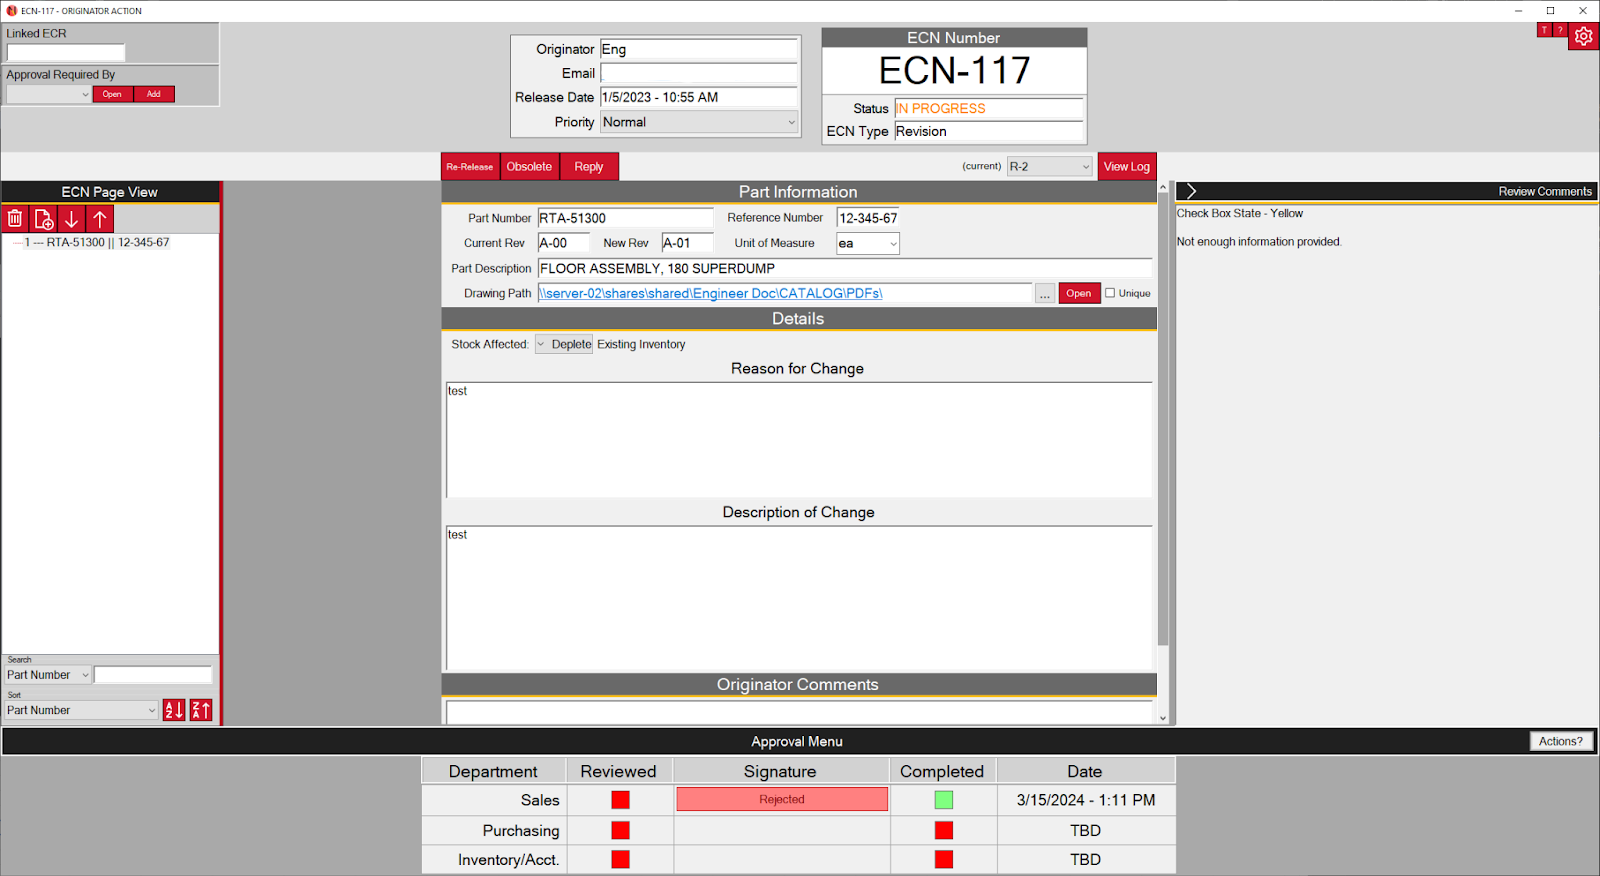 This is the view the originator has when they've received a rejected ECN. Note the "Rejected" from Sales in the Approval Menu at the bottom. Each page has review comments from the rejector which states their mark status at the top and their written notes below it.
The originator has a few options:- Re-Release: Make changes and increase the revision number of the ECN and start the approval process over
- Obsolete: Cancels and archives the ECN where no further changes will be made
- Reply: Message back the reviewer with additional information, clarification, or questions on their review
- The reviewer will then be able to approve or reject the ECN again, essentially continuing the approval process
ECN Walkthrough (4 of 4) - Log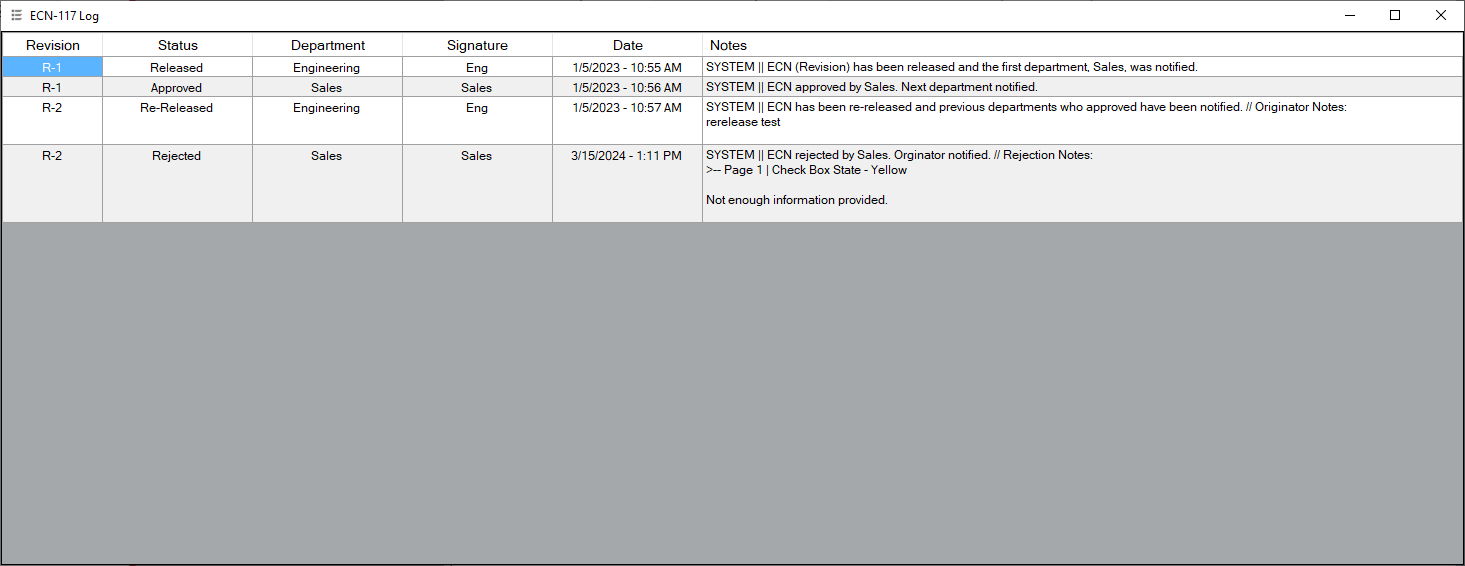 The log keeps track of each event in an ECN's life cycle. From any system update to user update, it even tracks the reviewer comments so they can be viewed at any time.
 - Automatic Email Updates
Windows Presentation Foundation (WPF)
-
Kanban Card Manager

C# - 90% Solo Development - Prism Framework
This application is quite simple and my first attempt at using Windows Presentation Foundation (WPF) and Prism. Naturally, I had to brute force my way through a lot at first, but once I got through the initial learning, I really enjoyed building this program in WPF! It very quickly won me over and it was much more intuitive for me to use than WinForms.
Another request from Engineering, the Kanban Manager Tool was designed to create clean and useful Kanban cards to be used throughout the shop. Kanban cards are a form of inventory management and once a part goes below its re-order point, employees can drop off the Kanban card at the Purchasing department where it can be re-stocked and the Kanban card returned.
I developed the most of the backend and frontend of this application. Once I was finished and working on another project, one of the engineers tweaked it slightly to allow for varying colors based on the part's re-order type and gave the cards a change in appearance. There were plans to connect this directly to our inventory management software, but we were never given the opportunity to do so.Feature List
- Manage Kanban Cards
- Create, print, and manage Kanban cards all in one place
- Barcodes
- Each Kanban card has a automatically generated barcode
0Card Creator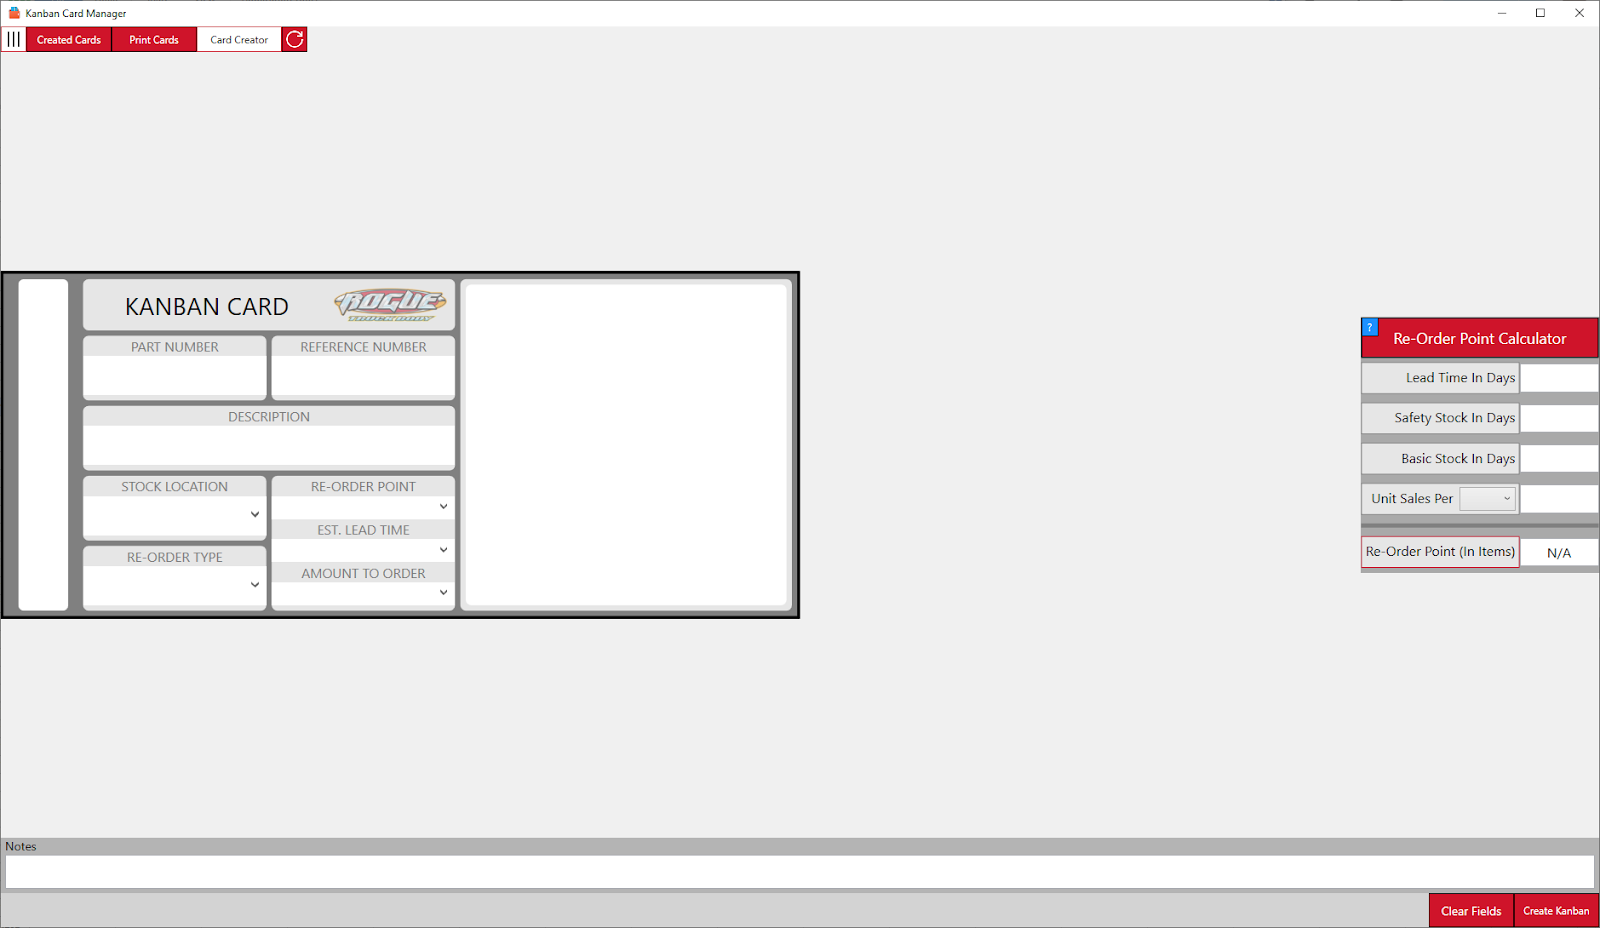 Users can add their own pictures to each Kanban Card and barcodes are generated on the left side of the card. A "Re-Order Point Calculator" is provided on the right for easily calculating the re-order point.Created Cards Menu (1 of 2)
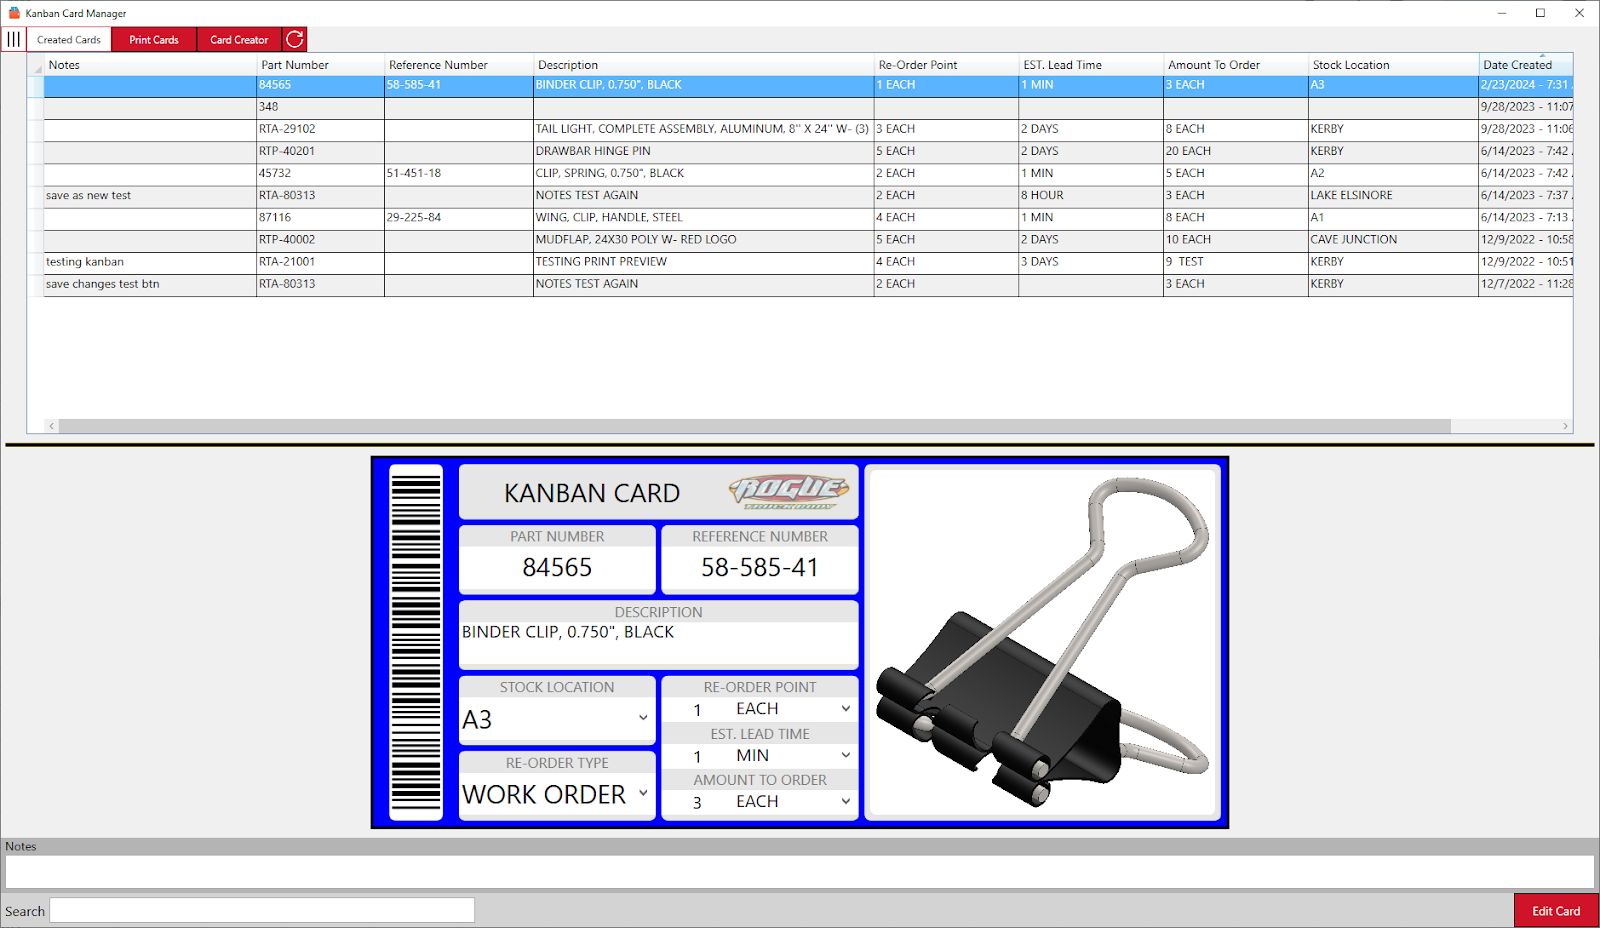 Here is where users can see all the Kanban cards that have been created. From here, users can edit existing cards.
The shown Kanban card is blue because it's re-order type is "WORK ORDER".Created Cards Menu (2 of 2)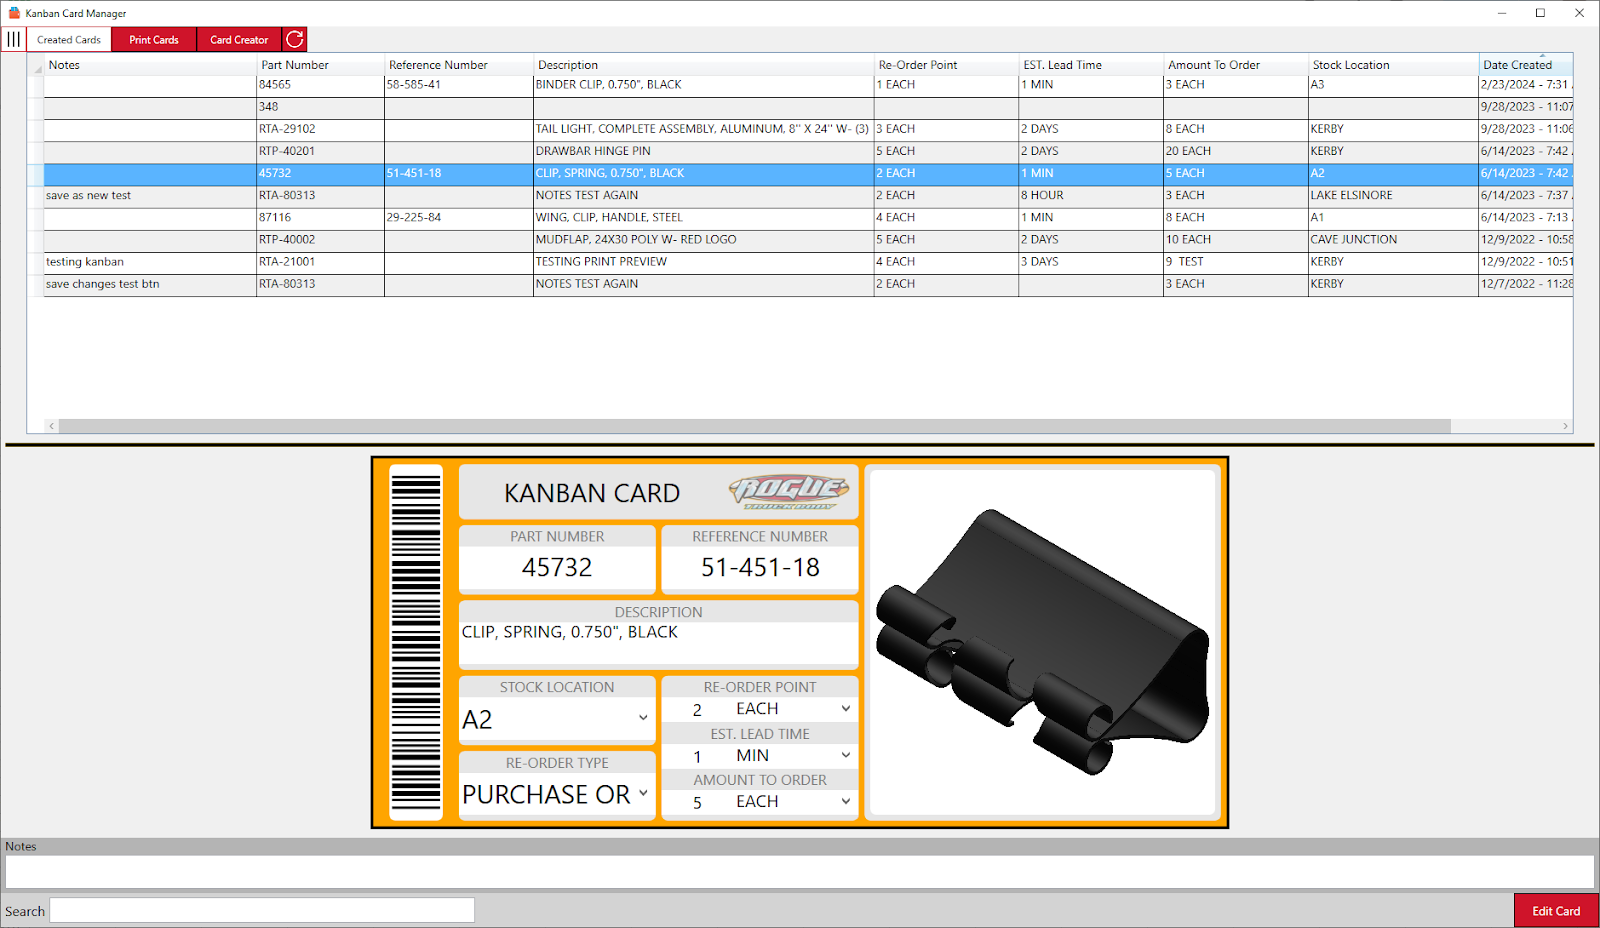 The shown Kanban card is yellow because it's re-order type is "PURCHASE ORDER".Print Cards
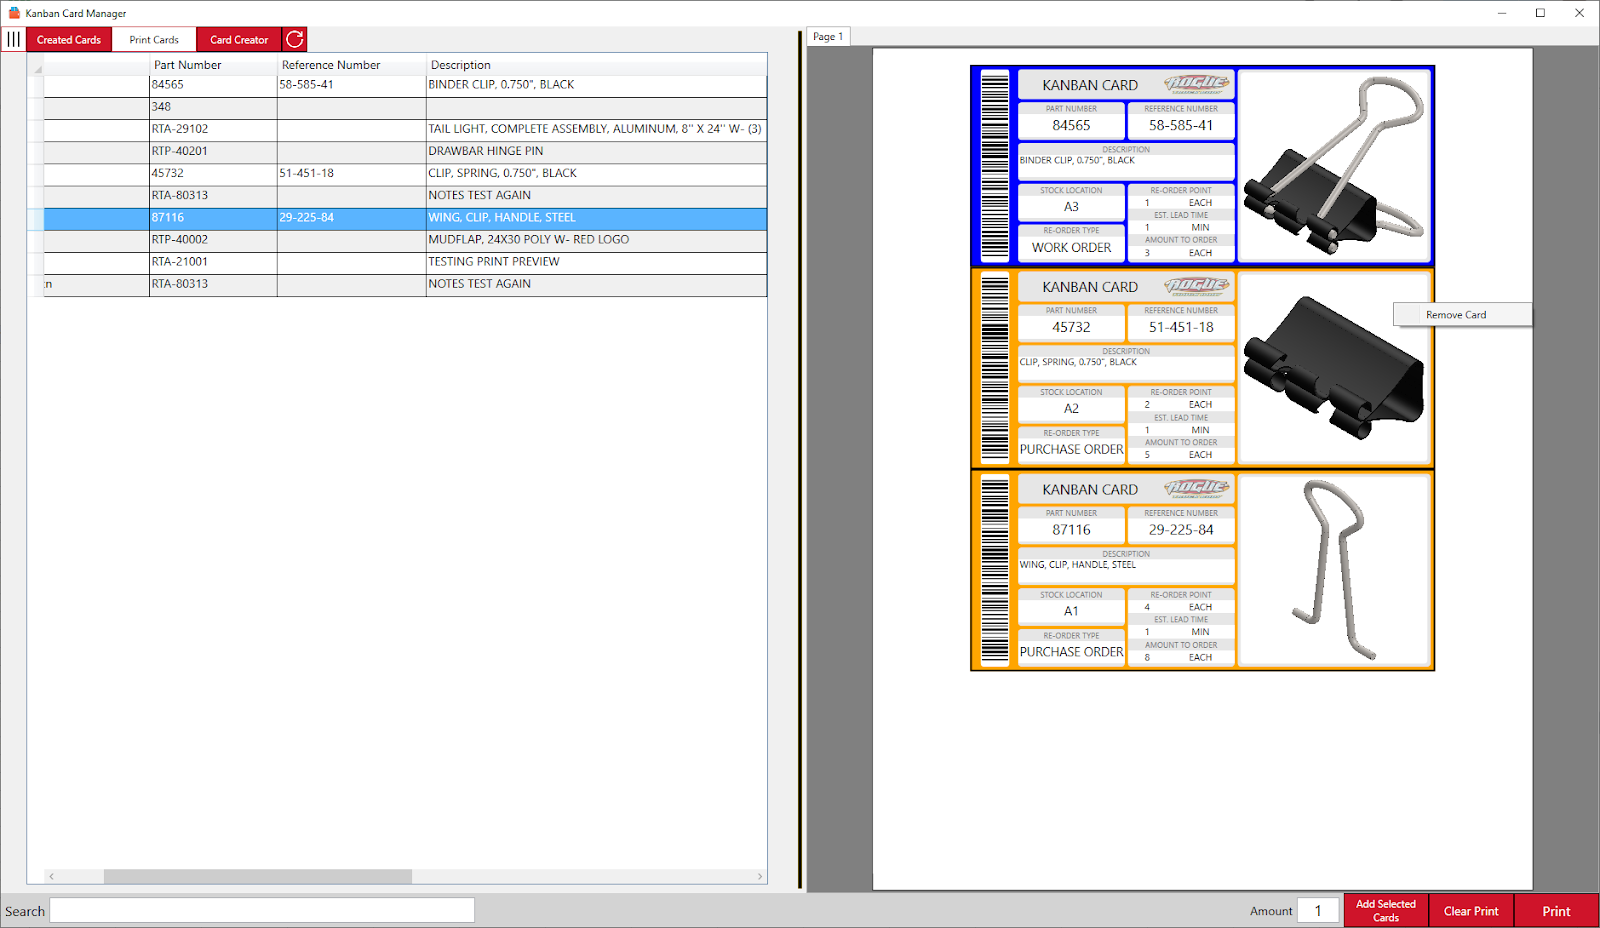 From here, cards on the left can be added to a print preview on the right side of the screen. Users can right click on cards in the print preview to remove cards and cards after the removed card will be moved to fill its space. Only Letter (8.5 x 11 inches) sized paper is supported
 - Manage Kanban Cards
-
Product Configurator
C# - Solo Development - Prism Framework
In this project I really focused on MVVM and creating a loosely coupled application using Prism. The purpose of this application was to create a way to populate the possible products of the Build Sheet Tool. Before this, I was using a large Excel spreadsheet and reading from that to get all the information for the Build Sheet Tool. This came with its own various problems and performance issues.
Each product's information is stored using JSON so that it can be quickly read by any application. Other information, such as who has a style checked out, is stored in an Access Database. By moving away from the Excel spreadsheet, I was able to modify the Build Sheet Tool to allow for retrieving previous product version information. For example, if version 2 is more expensive due to a price increase and the customer has already signed for version 1, you'd want to sell them what they signed for.Feature List
- Create Customizable Products
- Edit the items, item categories, options, and even rules of any product
- Version Control
- Substantial changes can be saved as increased versions of a product
- Color Coded Categories
- Each category can be color coded and appear as that color on the Build Sheet Tool's generated Build Sheet
- Check-In / Check-Out Products
- In order to edit a product, users must check-out the product which will lock it from being edited by another user
- Item, Option, and Rule Creation Wizard
- Follow through a simplified wizard when creating items, options, and rules
- Rule Outputs
- Rules are easy to understand with the "output" section, which will break down the rule into a color coded sentence
0Style Explorer The start screen of the application. I tried to make this application feel like a simple Microsoft application so users might feel a bit more familiar with it.
On this screen, users can do the following:- Create new styles
- View or edit existing styles
- Obsolete existing styles or restore obsoleted style
Views (1 of 3) - Items The items of a style are essentially the top level 'identifiers' of their options. For example, if the potential options of an item were "Red" and "Blue", the item name could be "Color". On the build sheet, this would be read as "Color: Red" or "Color: Blue".
In this view, the user can see each item on the left side. When clicking on an item, the options for that item appear in the upper right corner, and clicking on an options shows the rules for that option in the bottom right corner. The header for each table and the selected row changes color based which one was last clicked. This changes what will be affected by the "Selection" controls in the top left of the ribbon. Users can also right click on sections to bring up a context menu that has the same options as the "Selection" controls.
Each style has three different views (Item > Options > Rules) that can be navigated to via the buttons on the bottom left:- Items
- Options
- Rules
Views (2 of 3) - Options Options define an item's value and price. There can be multiple options in an item, but only one option may be selected. Selected options show their rules on the right side of the screen.
Each style has three different views (Item > Options > Rules) that can be navigated to via the buttons on the bottom left:- Items
- Options
- Rules
Views (3 of 3) - Options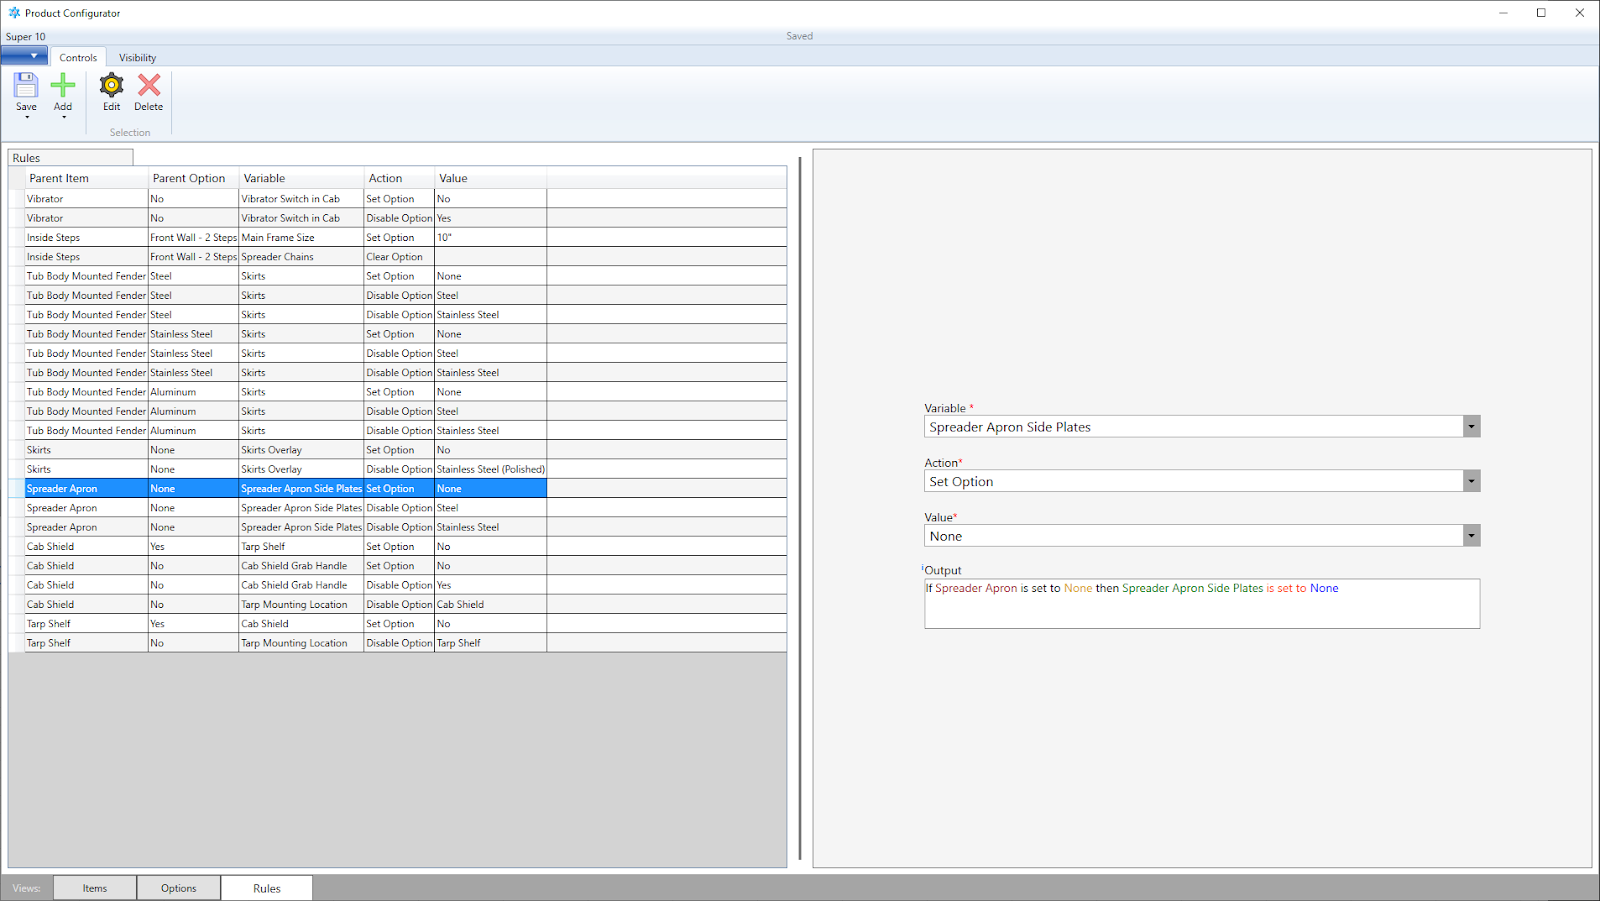 Rules allow for the blocking or automatic setting of options. When someone is filling out an order on the Build Sheet Tool, these rules would stop them from using options that are not applicable with eachother.
The "output" section of a rule states what the rule will accomplish in an easy to read format. The colored words are as follows:- "Spreader Apron": the rule's item
- "None": the set option of the rule's item
- "Spreader Apron Side Plates": the item that this rule will affect
- "is set to": the action this rule will perform
- "None": the new set option of the item that this rule affects
Each style has three different views (Item > Options > Rules) that can be navigated to via the buttons on the bottom left:- Items
- Options
- Rules
Visibility Ribbon Tab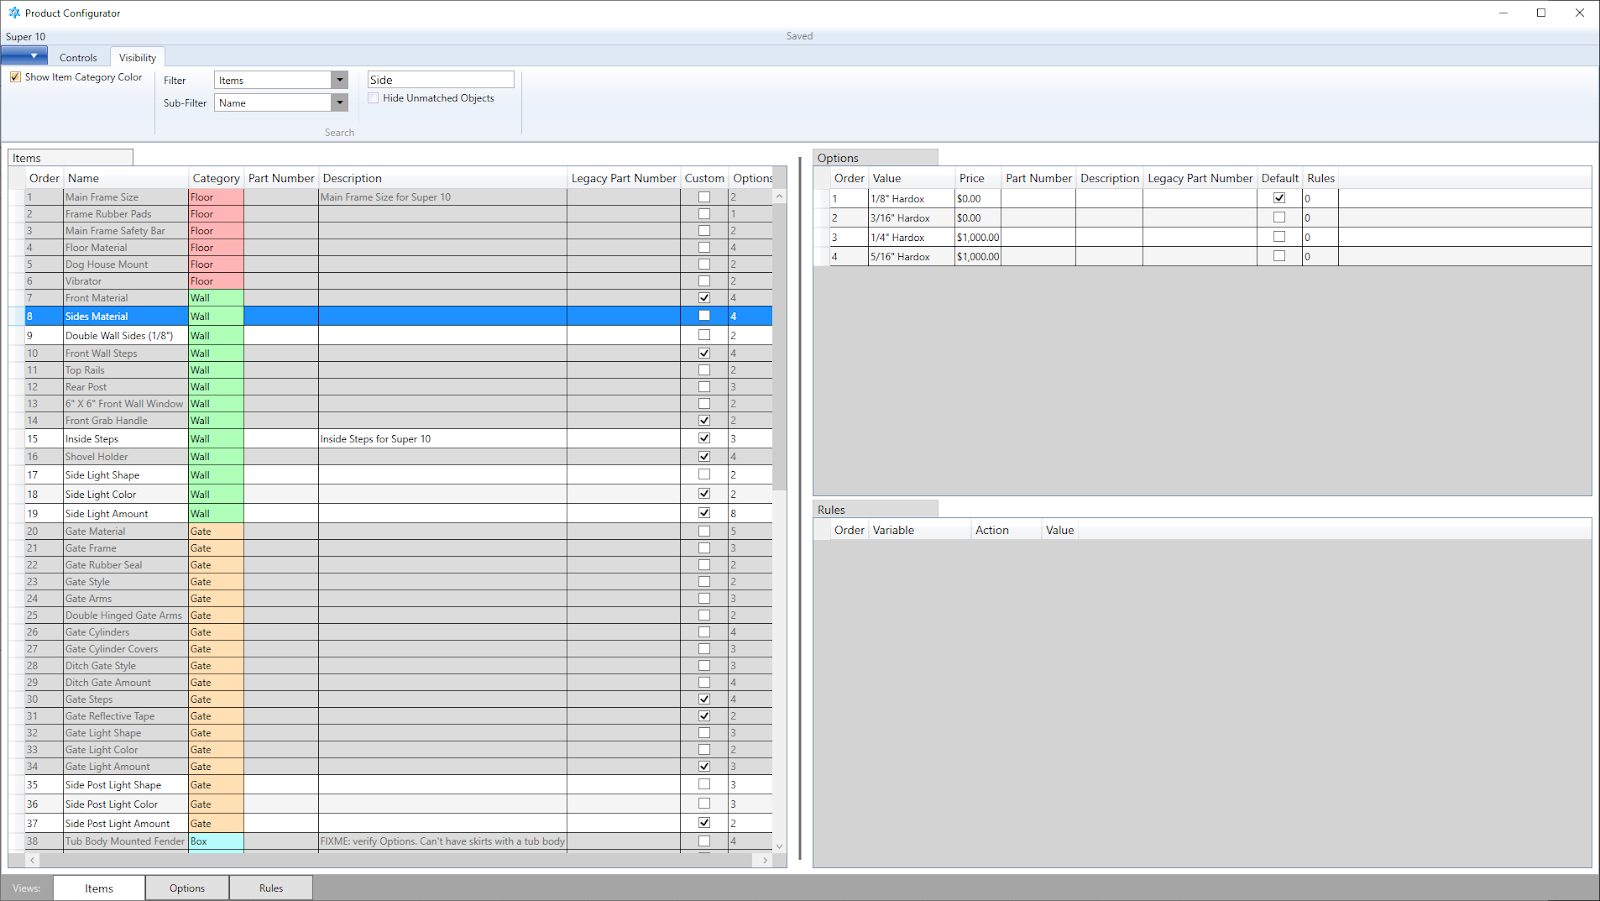 The controls in this ribbon tab allow users to increase visibility on the different views. This picture shows the item category colors being shown in the category column of each item. It also shows items that have been found by the search criteria.
Search criteria can be specific tables or all tables and as specific as which column to search. Objects that do not meet the search criteria can be greyed out (default) or hidden entirely.0Style System Menu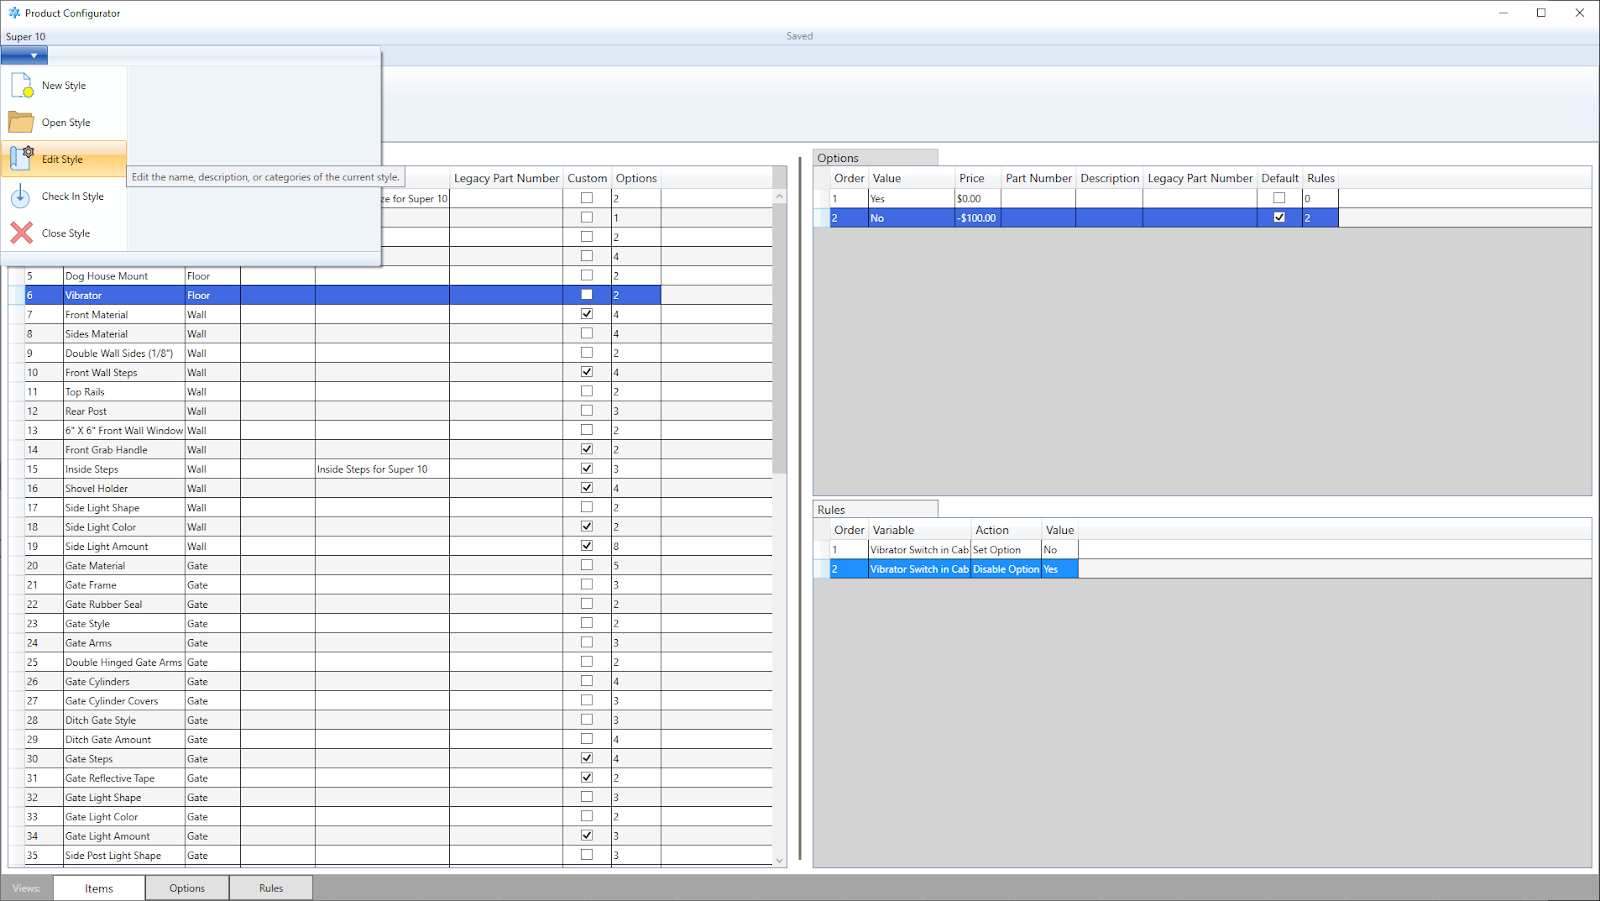 In the top left dropdown menu, users can quickly create new styles, open existing styles, or edit and check-in / check-out the open order. By editing the style, users can change the categories available and quickly change the categories of existing items.Style Settings (1 of 2) - Copying Categories
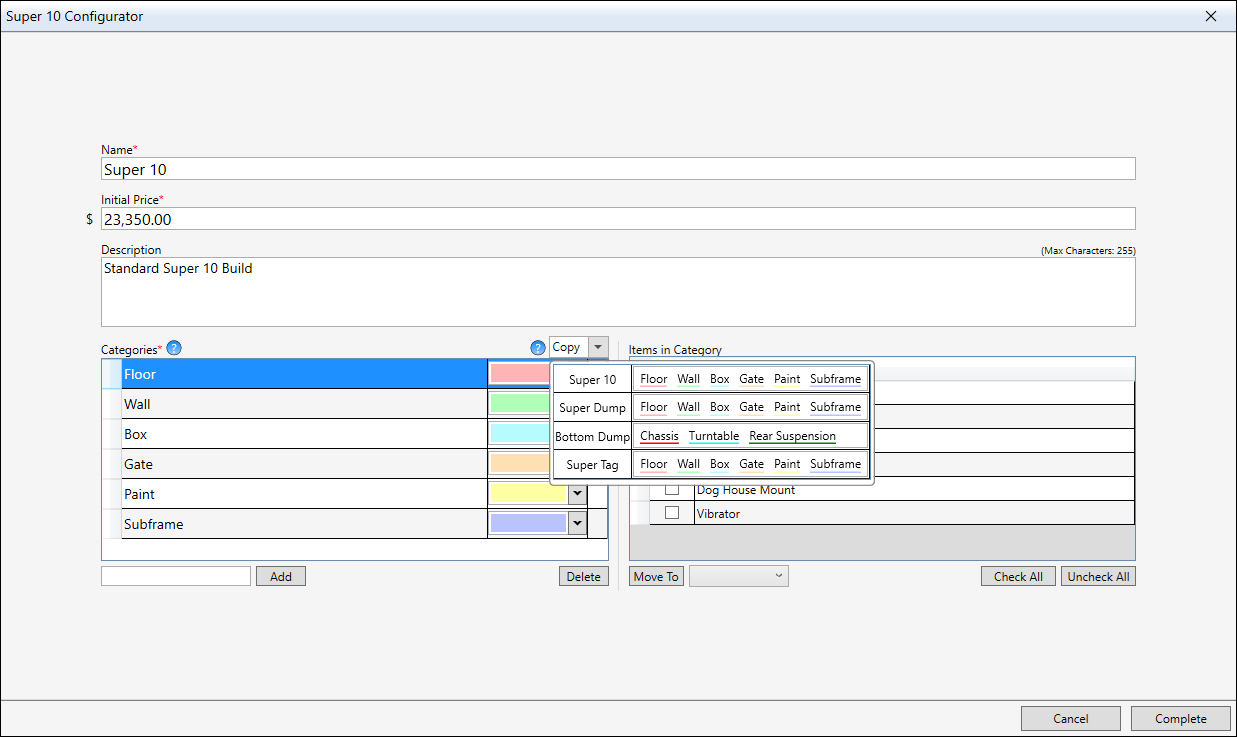 The most important thing users can change in this menu are the categories. Each category has a name and color, their top-to-bottom order in the table will determine their order on the generated build sheet of the Build Sheet Tool.
Categories can be easily copied from another style by clicking the dropdown with the word "Copy" in it, this will show a table of all existing style and their categories. In the first column, the style's name is displayed, and in the second, the style's category names and colors are displayed. In order to copy, users must right click on the style in the dropdown, this is to discourage accidental copying.
Selecting a style to copy makes any categories in the current style equal the color of the copied categories of the same name. If the current style does not contain the name of a copied category, the copied category will be added onto the current style's categories.Style Settings (1 of 2) - Editing Item Categories When a category is selected, all the items within that category are shown on the right. Users can then check items that they wish to move to different categories, then by selecting a category in the combobox and clicking the "Move To" button, the selected items will be moved to the selected category. The only other way to change an item's category would be to edit each individual item and change it.Views (3 of 3) - Options
Rules allow for the blocking or automatic setting of options. When someone is filling out an order on the Build Sheet Tool, these rules would stop them from using options that are not applicable with eachother.
When a category is selected, all the items within that category are shown on the right. Users can then check items that they wish to move to different categories, then by selecting a category in the combobox and clicking the "Move To" button, the selected items will be moved to the selected category. The only other way to change an item's category would be to edit each individual item and change it.Views (3 of 3) - Options
Rules allow for the blocking or automatic setting of options. When someone is filling out an order on the Build Sheet Tool, these rules would stop them from using options that are not applicable with eachother.
The "output" section of a rule states what the rule will accomplish in an easy to read format. The colored words are as follows:- "Spreader Apron": the rule's item
- "None": the set option of the rule's item
- "Spreader Apron Side Plates": the item that this rule will affect
- "is set to": the action this rule will perform
- "None": the new set option of the item that this rule affects
Each style has three different views (Item > Options > Rules) that can be navigated to via the buttons on the bottom left:- Items
- Options
- Rules
- Create Customizable Products
-
Solidworks Export Tool

C# - Solo Development - Prism Framework
This tool was made to streamline engineering's exporting from Solidworks. I built this as a place to run various Solidworks macros, but only the "Save As" macro was created / needed. By hooking directly into Solidworks, the application navigates the Solidwork's tree and reads metadata to generate the required extension types selected in the "Save As" macro.
Unfortunately, I do not have any pictures of this application truly interacting with Solidworks.Feature List
- Lower Export Time from Solidworks
- Export multiple parts as multiple extensions all at once with the single click of a button
- Log Exporting
- Specify an Access Database, or a location of an Access Database, and the applicataion will add rows for each part stating its exports done and the date of the export
- Direct Solidworks Integration
- The application links directly with an open Solidworks application to read all the information required to export
- Color Scheme Settings
- Change the color scheme of the entire application to any colors you want at any time
0Home Tab (1 of 2) This is one of three tabs at the top and what users will primarily be working in. First the user must connect to their open Solidworks app, then get their "Active Doc". Once they've done that, they can get all the children parts / assemblies of their active doc. When these are successful, the red square to the right of each will turn green. The application will place information from the active doc and all its children into the table on the middle left side of the screen. Users will select the parts they want to export in this table.
On the right side of the screen is a tab control with the first tab being "Save As". This was the intended area for more macros to be placed and ran when selected.Home Tab (2 of 2)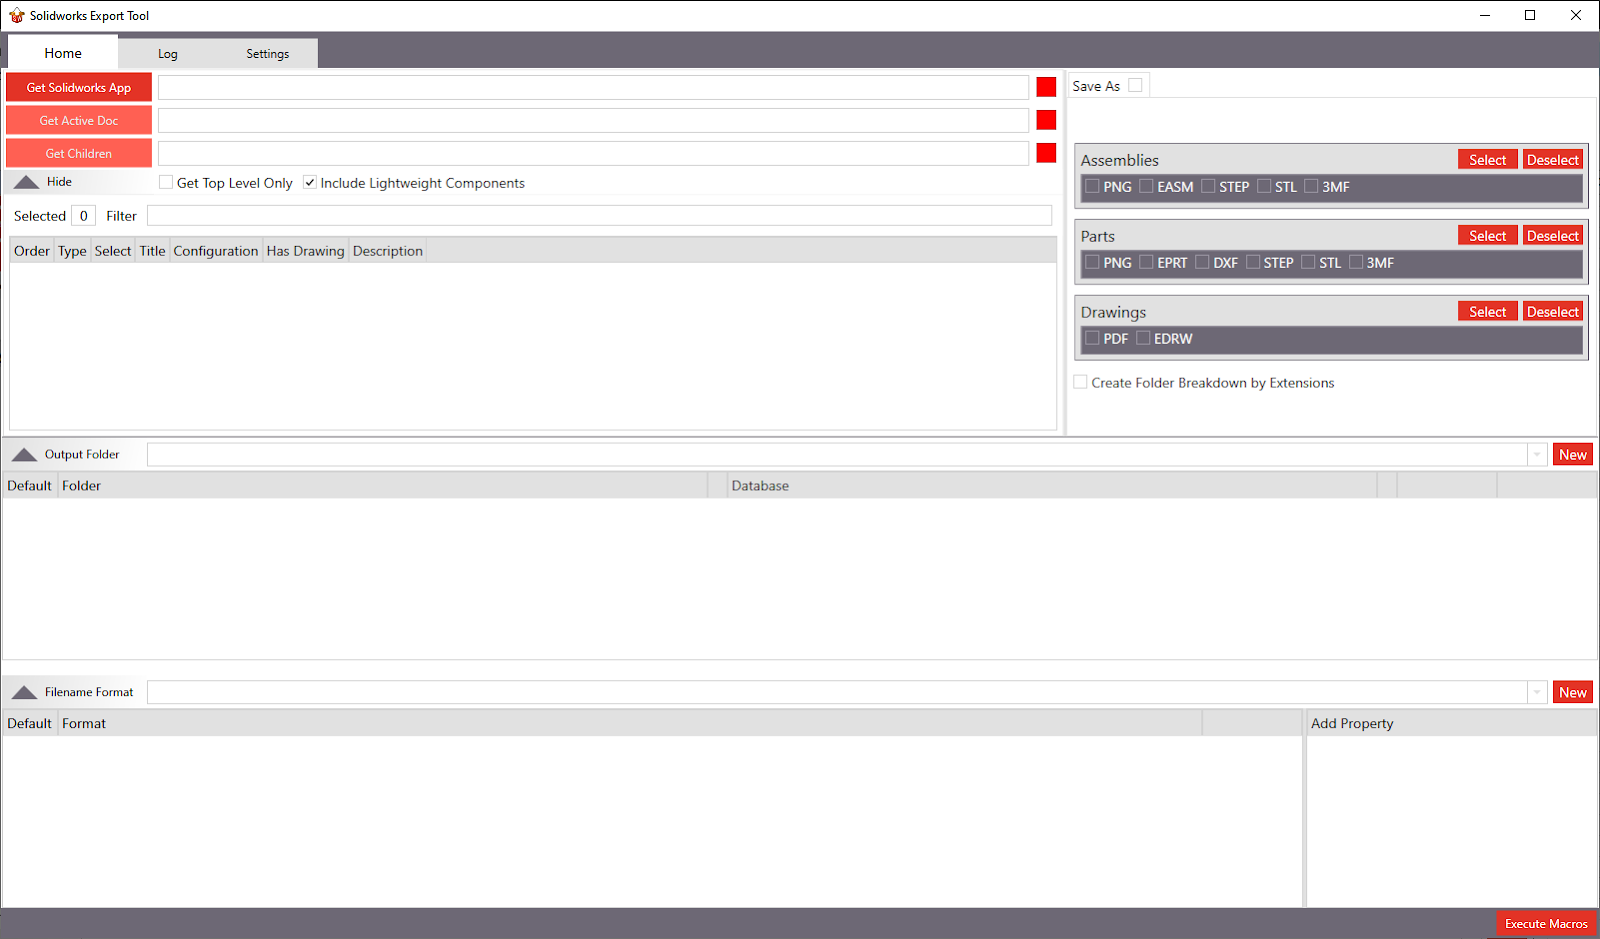 The "Output Settings" are at the bottom of the page and can be hidden to make more space above. The first option is the "Output Folder", this is the location where the exported extensions will be placed. This is also the place to specifiy an Access Database for further export logging.
Next is the "Filename Format" section, users can make each filename follow same format using this method. The application will read the available properties of the parts and add them to the bottom right list view. Users can click a property to add it to the filename, so when a part is exported, it will take that property of the exported part and put it into the filename. Any other generic text can be added as well to separate properties. Parts that do not have a property from the filename format will throw a warning during exporting.Log Tab All of the current statuses of the export will be placed here and the table consists of each part being exported and all the exports being done for that part as a nested table. Users can right click on parts actively being exported to skip them. Once an export has been started a status bar will be placed on the bottom of the entire application stating how many parts are left and which part is currently being worked on. Through this menu, users can pause or cancel the export at any time.Settings (1 of 3)
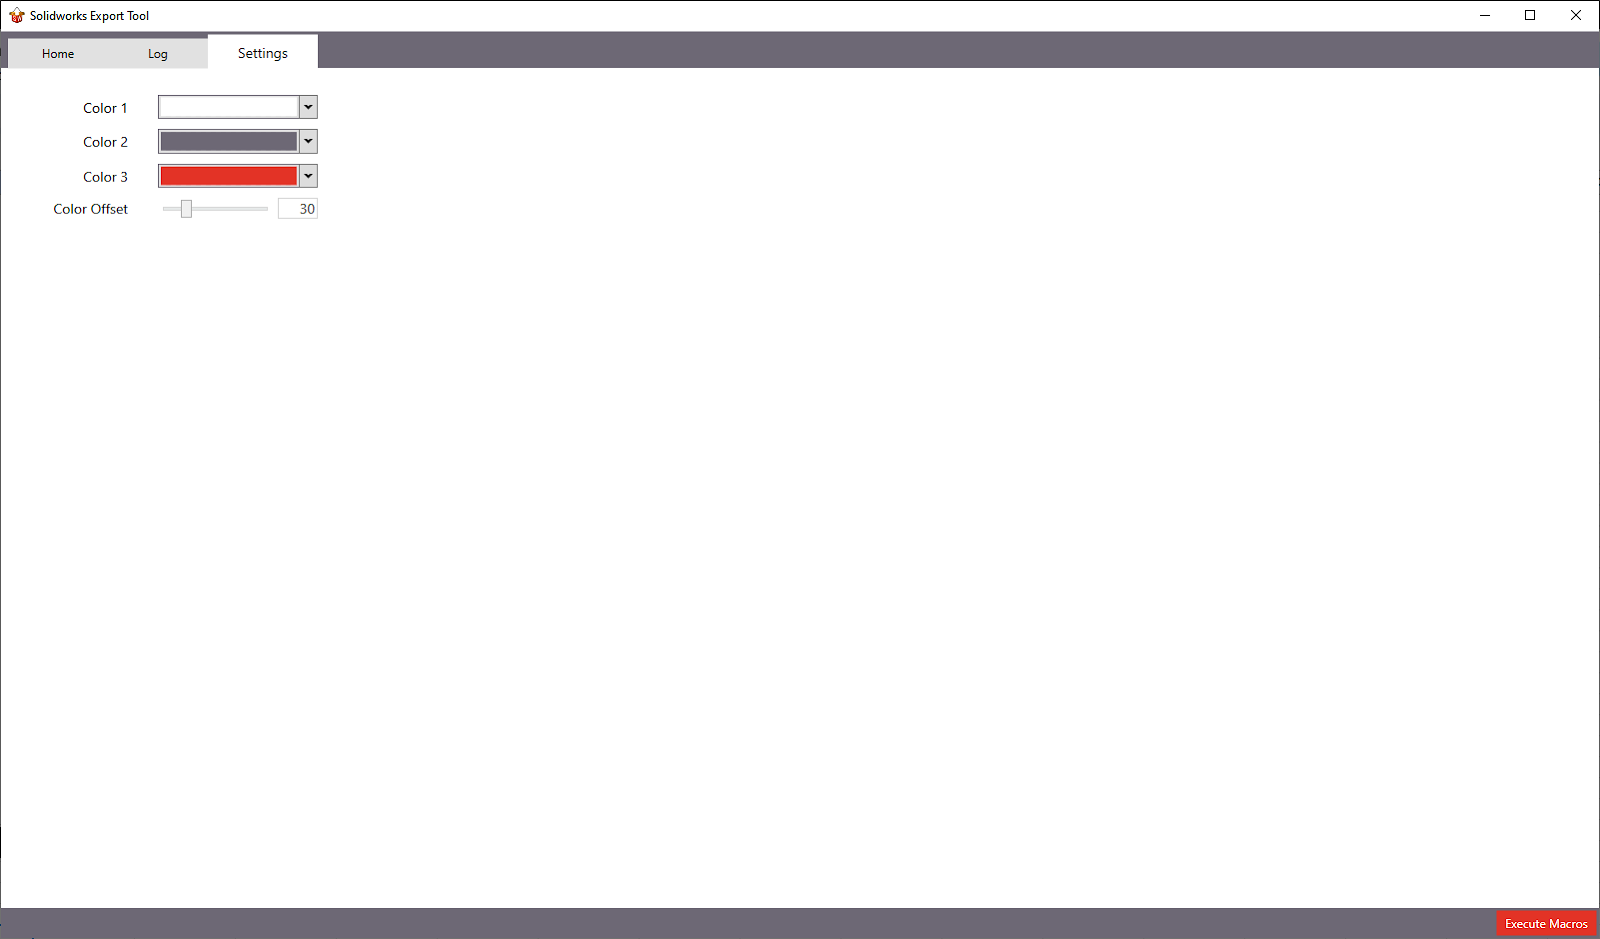 The only options in the settings tab are for changing the color scheme of the application. This was done because it seemed interesting to try out and I had some free time to mess with it. I went with the 6:3:1 rule, where "Color 1" is ~60%, "Color 2" is ~30%, and "Color 3" is ~10% of the application. I also shade the some amount for specific nested or hovered things. By changing the "Color Offset" this will affect how intense that shading is.Settings (2 of 3)
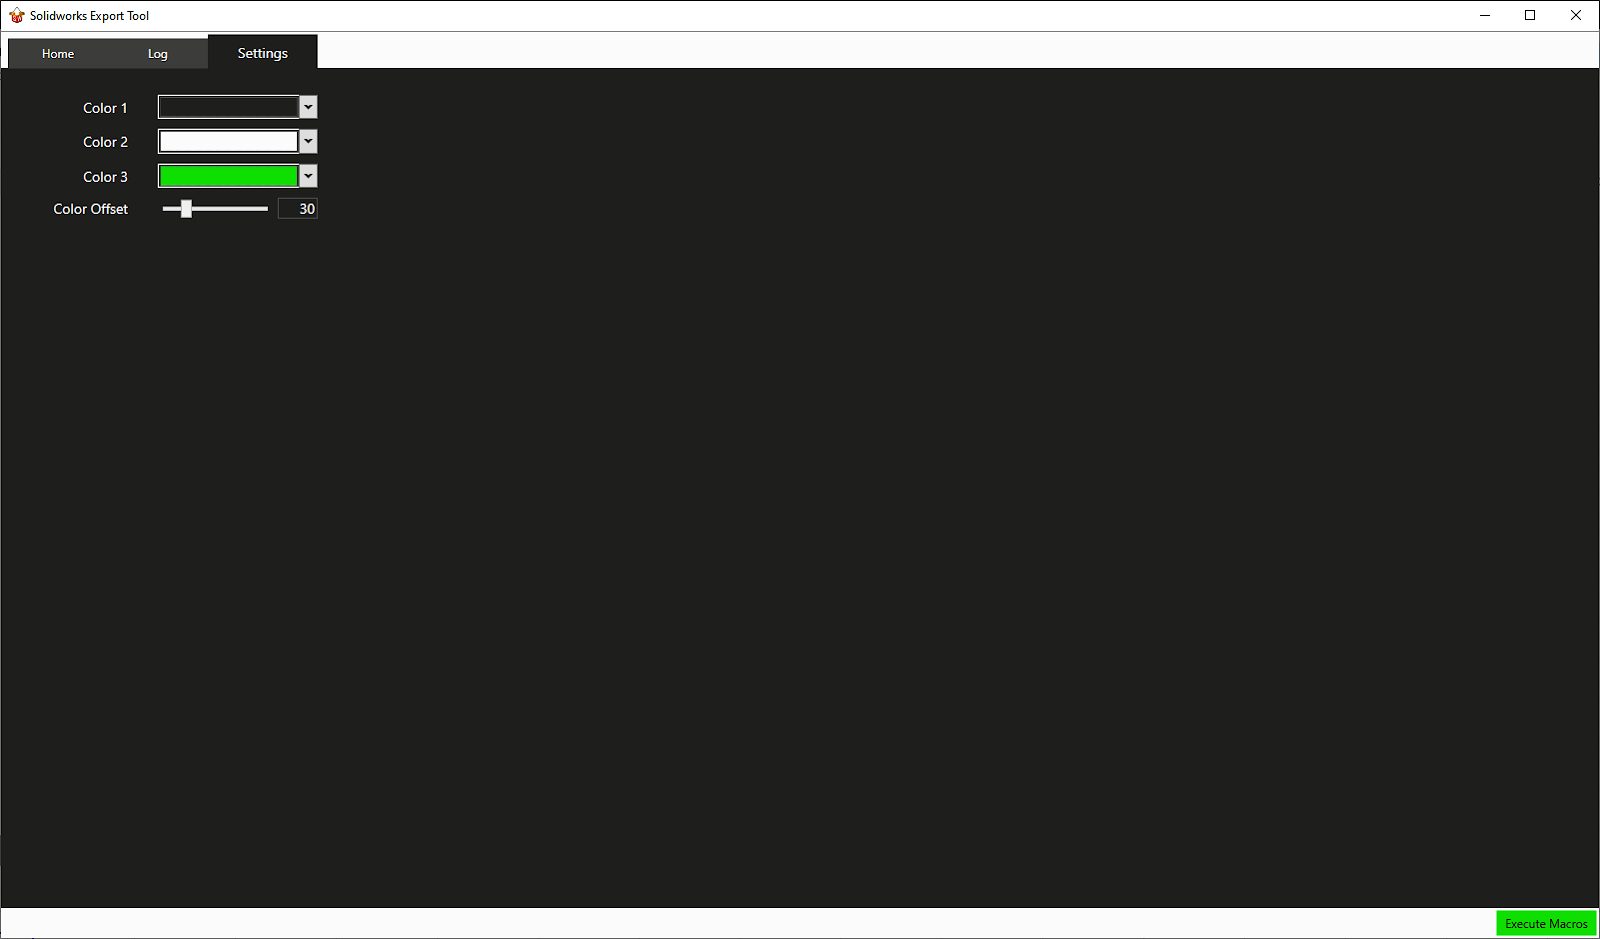 Here is an example of changing the color scheme of the application. All the changes to color can be made in realtime and do not require a restart of the application.Settings (3 of 3)
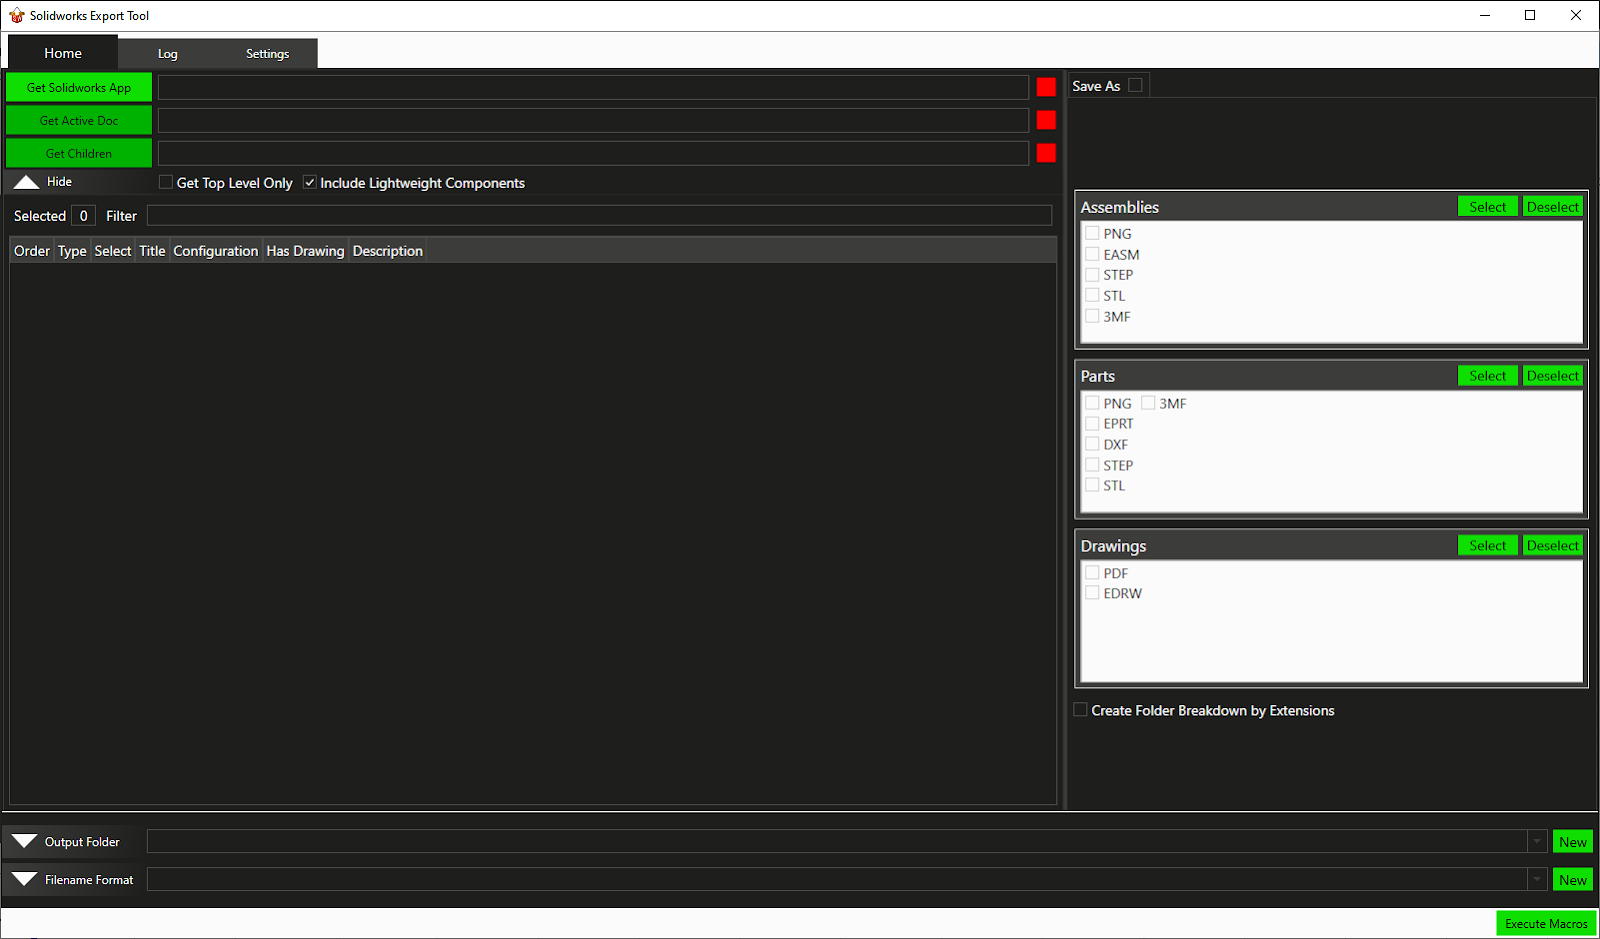 This is the home tab with the new colors set in the settings menu.
 - Lower Export Time from Solidworks
-
Build Sheet Tool (Version 2)
/rogue_build_sheet_tool_icon.png)
C# - Solo Development - Prism Framework
This application was the next step for the Build Sheet Tool and was a culmination of everything I had learned with WPF and Prism. It was planned to have more features and be easier to use than the first Build Sheet Tool, however, I was not given the time to complete it and was pulled away from application development in general to fill a different role in the company. I still believe it deserves some merit though, since I took the jump from an Access Database to a Microsoft SQL Server and added onto some features of the first Build Sheet Tool.
I also made most of the application wide icons in Inkscape. For the other applications, I would only make the main application logo, but in this application, I wanted to create exactly the icons I wanted for each use. This also gave me the ability to easily make white and black versions of each icon for swapping when the color scheme required it.Feature List
- Improved UI and Functionality
- Use easier to follow UI and increased features in the application as a whole
- Configurable Items
- Items and options (and rules) are configured via a separate application for quality control (Product Configurator)
- Check-In / Check-Out Orders
- In order to edit an order, users must check-out the order which will lock it from being edited by another user
- Logins
- The first Build Sheet Tool had no way to log in as a specific user, now, users must log into an account with appropriate permissions to edit orders
- Change Log / Logging (PARTIALLY IMPLEMENTED)
- Know exactly which user made changes and when with in-depth logging and modification tracking for each order
- Revision Control
- View previous revisions alongside the current revision of each order
- Color Scheme Settings
- Change the color scheme of the entire application to any colors you want at any time
0Order Tabs - In Progress/in_progress_tab.png) Similar to the first Build Sheet Tool, there are three main tabs for choosing orders to view:
Similar to the first Build Sheet Tool, there are three main tabs for choosing orders to view:- Pending: Create, view, or edit orders that are not signed / not in production
- In Progress: view or edit orders that are either in production or ready to be put into production
- Archive: view orders that are completed or have been obsoleted
Order Tabs (1 of 3) - Customer Information/opened_orders_customer_information.png) Customer information can be save via the "Customers" tab in the bottom left. This lets users entering information to quickly select their customer and autofill the customer's information.
Customer information can be save via the "Customers" tab in the bottom left. This lets users entering information to quickly select their customer and autofill the customer's information.
There are three main tabs of an order:- Customer Information: typical customer information is entered here, such as: customer name, address, and contact information
- Rogue Information: In this case, it is specialized for "Rogue", but this is the place to enter the internal salesman information and other internal order information like an "Estimate Number"
- Box Editor: Here is where the information from the Product Configurator would be used to create multiple customizable products that would populate the order
Order Tabs (2 of 3) - Rogue Information/opened_orders_rogue_information.png) Salemen information can be save via the "Salesmen" tab in the bottom left. This lets users entering information to quickly select the salesman and autofill the salesman's information.
Salemen information can be save via the "Salesmen" tab in the bottom left. This lets users entering information to quickly select the salesman and autofill the salesman's information.
There are three main tabs of an order:- Customer Information: typical customer information is entered here, such as: customer name, address, and contact information
- Rogue Information: In this case, it is specialized for "Rogue", but this is the place to enter the internal salesman information and other internal order information like an "Estimate Number"
- Box Editor: Here is where the information from the Product Configurator would be used to create multiple customizable products that would populate the order
Order Tabs (3 of 3) - Box Editor/opened_orders_box_editor.png) There's quite a lot to unpack here, so I'm not going to go super in-depth. Users can add as many "products" as needed and can select the specific product (style) that have been generated within the Product Configurator. This brings in each item as a row in the right side table and each item's option into the "Value" column as a dropdown. If the item is marked as "Custom" in the Product Configurator, a "Custom" option will be added to the dropdown which would replace the item's value on the estimate / build sheet with the "Description" column.
There's quite a lot to unpack here, so I'm not going to go super in-depth. Users can add as many "products" as needed and can select the specific product (style) that have been generated within the Product Configurator. This brings in each item as a row in the right side table and each item's option into the "Value" column as a dropdown. If the item is marked as "Custom" in the Product Configurator, a "Custom" option will be added to the dropdown which would replace the item's value on the estimate / build sheet with the "Description" column.
There are three main tabs of an order:- Customer Information: typical customer information is entered here, such as: customer name, address, and contact information
- Rogue Information: In this case, it is specialized for "Rogue", but this is the place to enter the internal salesman information and other internal order information like an "Estimate Number"
- Box Editor: Here is where the information from the Product Configurator would be used to create multiple customizable products that would populate the order
Box Editor (1 of 2) - Previous Revisions/opened_orders_previous_revision.png) Users can view previous revisions of an order by selecting the revision they want to view in the revision dropdown. Previous revisions will have a colored border around them to make them stand out from the current revision. The revision of the shown order is also shown in the top left title for the order.Box Editor (2 of 2) - Multiple Windows
Users can view previous revisions of an order by selecting the revision they want to view in the revision dropdown. Previous revisions will have a colored border around them to make them stand out from the current revision. The revision of the shown order is also shown in the top left title for the order.Box Editor (2 of 2) - Multiple Windows/opened_orders_new_window.png) The application supports multiple popout windows for side-by-side viewing of orders. This also includes the ability to pop previous revision windows in and out. To pop out a window, users can click the box with an arrow going out of it in the top right corner. To pop it back in, users can click the box with an arrow pointing inwards, which is also in the top right corner.
The application supports multiple popout windows for side-by-side viewing of orders. This also includes the ability to pop previous revision windows in and out. To pop out a window, users can click the box with an arrow going out of it in the top right corner. To pop it back in, users can click the box with an arrow pointing inwards, which is also in the top right corner.
In this image, the current revision is popped out, while the previous revision is still inside the main application.0Customers Tab/customers_tab.png) Customers can be added, edited, and deleted through this menu. Only users with permissions to edit customers can edit this tab.
Customers can be added, edited, and deleted through this menu. Only users with permissions to edit customers can edit this tab.
The customers listed in this tab are available to select in the "Customer Information" tab in the order. Doing so will autofill information listed in this tab.Salesmen Tab/salesmen_tab.png) Salesmen can be added, edited, and deleted through this menu. Only users with permissions to edit salesmen can edit this tab.
Salesmen can be added, edited, and deleted through this menu. Only users with permissions to edit salesmen can edit this tab.
The salesmen listed in this tab are available to select in the "Rogue Information" tab in the order. Doing so will autofill information listed in this tab.Admin Menu/admin_menu_tab.png) Only logged in admin users can view this tab. From this tab, admins can add, edit, and delete users or change specific user permissions.Settings Menu (1 of 2)
Only logged in admin users can view this tab. From this tab, admins can add, edit, and delete users or change specific user permissions.Settings Menu (1 of 2)/settings_tab.png) Currently, the only available settings are for the application wide color scheme. This uses the same 6:3:1 color rule as the Solidworks Export Tool, except this application allows for multiple saved color profiles. "Light" and "Dark" are system color schemes that cannot be updated or deleted.
Currently, the only available settings are for the application wide color scheme. This uses the same 6:3:1 color rule as the Solidworks Export Tool, except this application allows for multiple saved color profiles. "Light" and "Dark" are system color schemes that cannot be updated or deleted.
Settings are saved per user and per computer, meaning that logged in users will have different color profiles and an application that has no logged in user will save the color profiles as the settings of the computer.Settings Menu (2 of 2)/settings_tab_changed.png) This displays an example of a different color scheme selection. Note that the icons and text will be black or white depending on the object they are on top of.
This displays an example of a different color scheme selection. Note that the icons and text will be black or white depending on the object they are on top of. - Improved UI and Functionality
-
Fishbowl BOM Costing

C# - Solo Development - Prism Framework
The inventory software, Fishbowl, does not have any true, reliable way to calculate the rolled up Bill of Materials (BOM) costs. They also do not have a way to automatically take that rolled up cost and set it as the cost for the finished good(s) of the BOM. Now, Fishbowl has their reasons for this I'm sure, but my CEO at the time wanted to be able to do this regardless. So, I whipped this application up in 2 - 3 weeks with a class library I made for integrating with Fishbowl. I had this library somewhat done beforehand in preperation for my applications to retrieve and update information from Fishbowl.
Fishbowl is a very complicated software with a lot of quirks, and trying to explain all of them, and how this application uses them would take quite a while.Feature List
- Parts Rolled Up BOM Costing
- A part's cost can be calculated with its default BOM
- Vendor Part Costing
- A part's standard cost field can be updated automatically based off its default vendor cost
- Inventory Cost Changes
- Directly see how much the change in cost will affect current inventory values
- Automatic Memo Posting
- Memos (Notes) are posted to each changed part in Fishbowl stating the change, previous state, and current state
- Logging
- Logs of each post to Fishbowl are saved and viewable in the application
0BOM Costing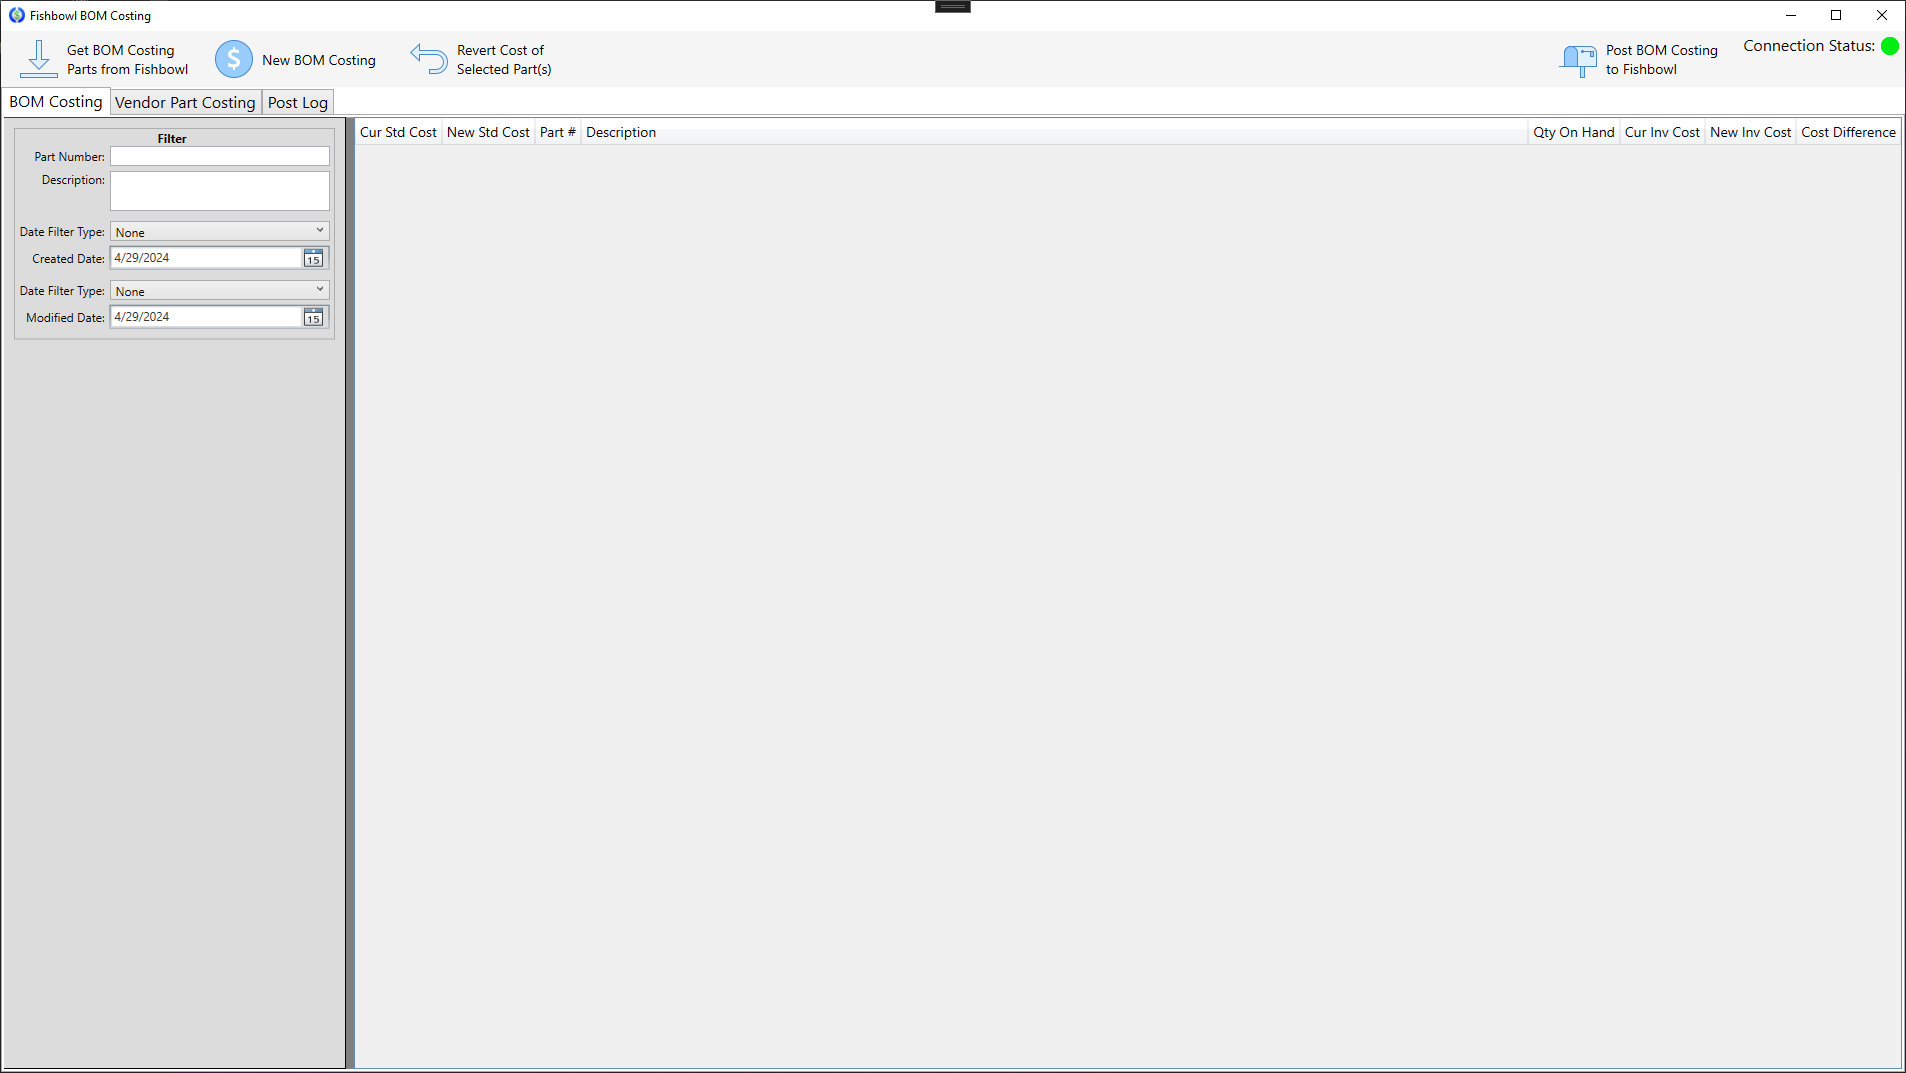 Clicking the "Get BOM Costing..." button in the top left will retrieve all parts from Fishbowl that have a default BOM. Clicking "New BOM Costing" in the top left will run through each part found and put its calculated cost into the "New Std Cost" (New Standard Cost) column of the table and highlight it. Users can also enter in a manual value which will color the cell orange. Right clicking on any row will also let the user run BOM costing on any selected row.
A progress bar will appear at the bottom of the application stating which part's cost is being calculated and how many are left in the queue. This process is asynchronous and parts can be added to a running queue. Once all the desired parts have been calculated, clicking the "Post BOM Costing..." button in the top right will post any changed parts to Fishbowl. This will also add a Memo to each part stating that the change was made from this application and the previous and new cost of the part. In addition, the application will save each posted part into a log file which is viewable through the "Post Log" tab.
Users can filter the parts found by any field in the left side "Filter" view. Lastly, any part can be selected and have its cost changed back to the current standard cost through the right click context menu, or through the "Revert Cost of..." button at the top of the application.Vendor Part Costing Features here are nearly identical as the BOM Costing tab. Instead of getting parts with default BOM's, this tab will get each part with a default vendor part. If the default vendor part's Unit of Measure (UOM) is different than the retrieved part, it will convert the vendor part's UOM to the part's UOM and calculate the appropriate cost.Post Log
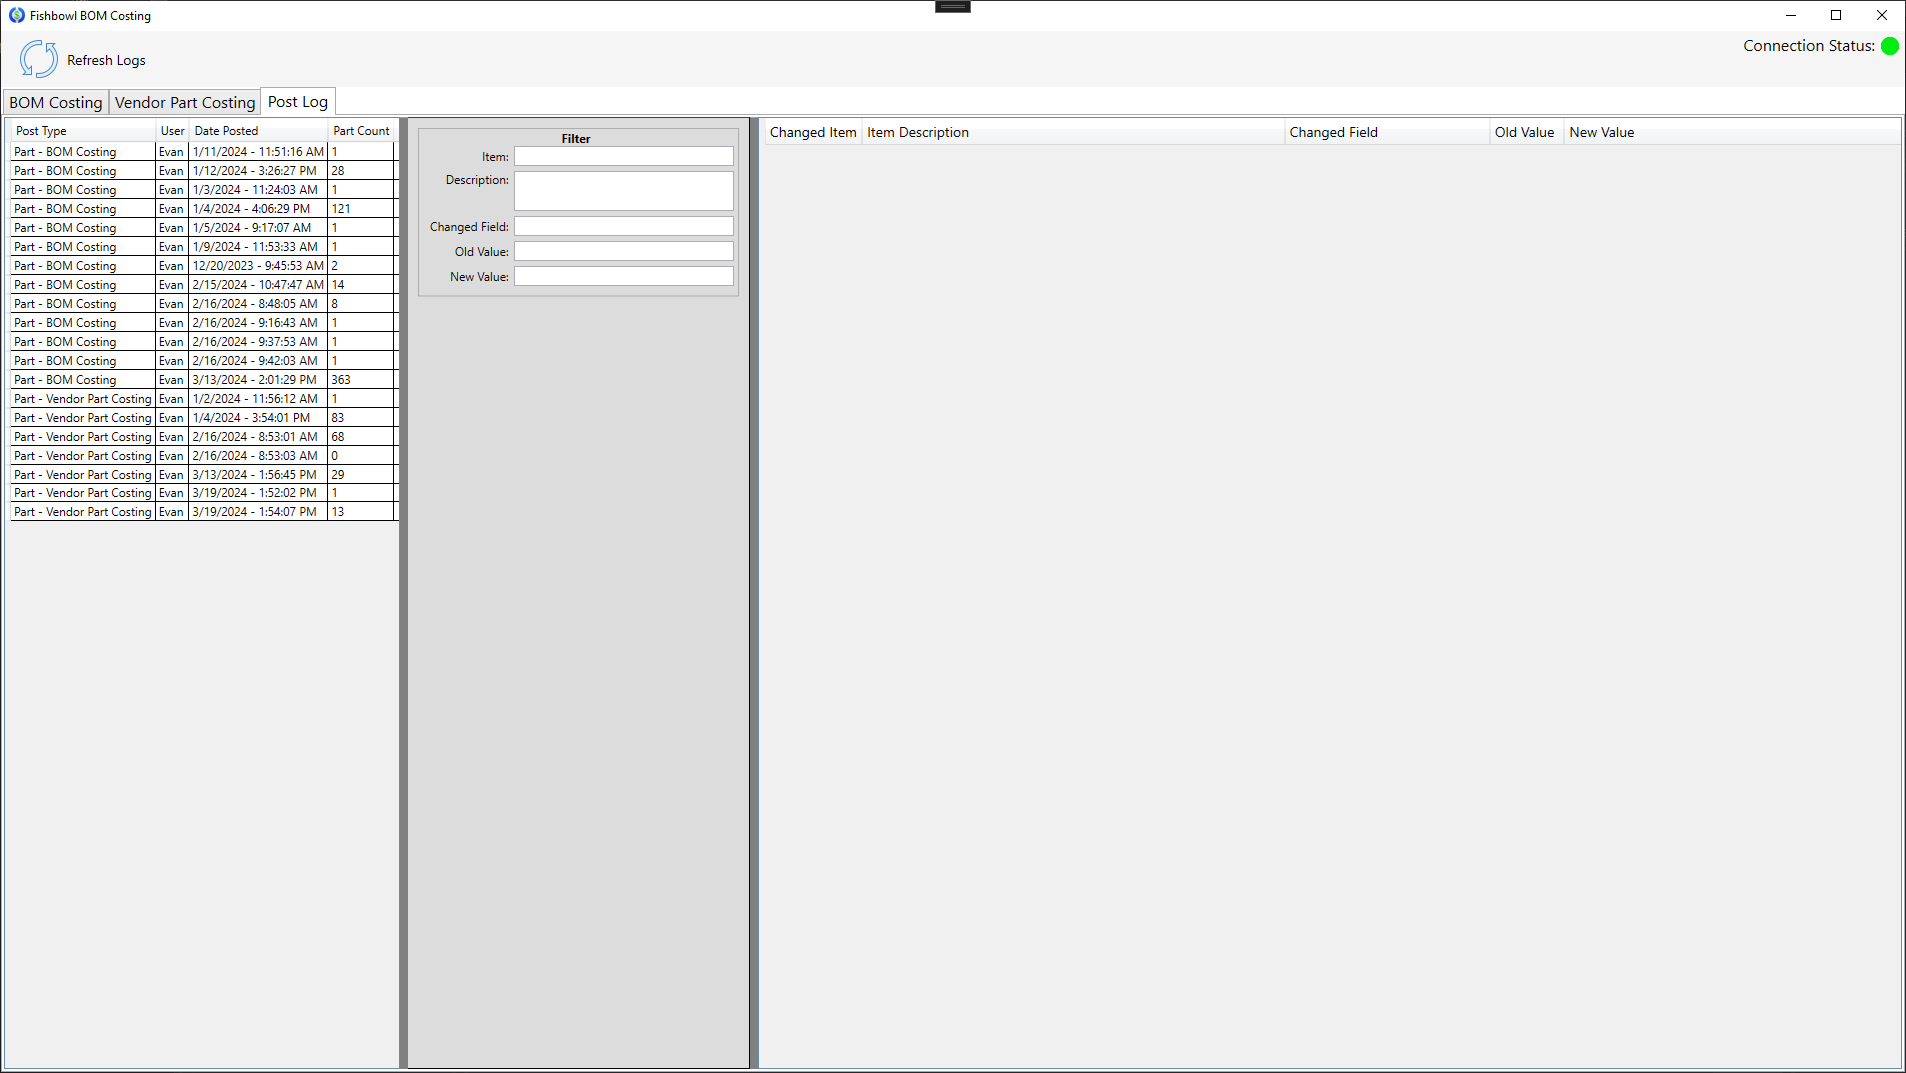 This is where each post to Fishbowl is logged and viewed.
 - Parts Rolled Up BOM Costing